Prerequisites
Alation Cloud Service Applies to Alation Cloud Service instances of Alation
Customer Managed Applies to customer-managed instances of Alation
Before you install the Impala on Cloudera Data Platform (CDP) OCF connector or before adding the data source to the catalog, ensure that you have performed the following:
Enable Network Connectivity
Open outbound TCP port 21050 to the Impala server
Open outbound TCP port 9083 to the metastore
Open outbound TCP port 9870 to the HDFS server
Open outbound TCP port 9871 to the HDFS server if the cluster uses TLS.
Open outbound TCP port 9864 on all cluster data nodes to Alation traffic when using webHDFS
Open outbound TCP port 9865 on all cluster data nodes to Alation traffic when using secure (TLS) webHDFS
Open outbound TCP port 443 on all cluster data nodes to Alation traffic
Create a Service Account
Create a service account for each of these different services used by Alation:
Impala
Metastore
HDFS
Based on your requirement, you can create three different service accounts or one service account for these services.
The service account requires these permissions:
SELECT permission for all schemas which you plan to extract into the catalog.
Read and execute permissions for Impala external tables.
Access to the Metastore.
Read permission for the HDFS location that stores Impala query logs.
In case your Impala data source is kerberized, we recommend creating the service account in the same realm as the realm used by Impala users.
Configure Hive
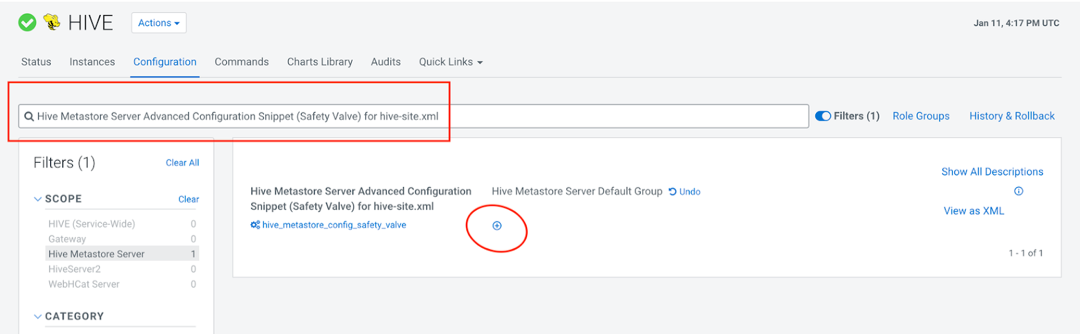
Ensure that in the Hive service configuration, the property metastore.storage.schema.reader.impl is set to rg.apache.hadoop.hive.metastore.SerDeStorageSchemaReader.
To check the value or set it:
Open the Cloudera Manager homepage.
Click on Hive.
Click the Configuration tab.
On the Configuration tab, search for Hive Metastore Server Advanced Configuration Snippet (Safety Valve) for hive-site.xml and click the plus icon on Hive Metastore Server Default Group.
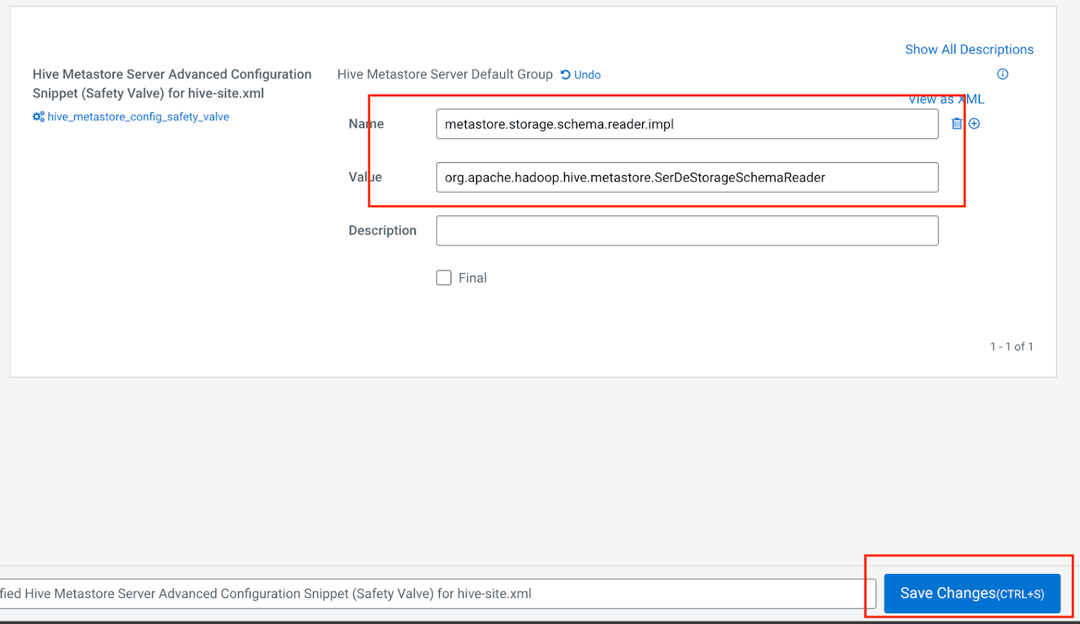
In the Name field, enter the name
metastore.storage.schema.reader.impl.In the Value field, enter the value
org.apache.hadoop.hive.metastore.SerDeStorageSchemaReader.Click Save Changes.
A restart icon will pop up after a few seconds. Click on it to restart the service.
In the window that opens, click Restart Stale Service.
Select Re-deploy client configuration and then click Restart Now.
Wait for the service to restart and then click on the Continue button that will appear after the restart.
Extract Complex Data Types
The Impala on CDP OCF connector supports extraction of complex data types, such as map, array, and struct. To enable their representation in the Alation user interface as a tree structure, on your Alation instance, set the alation_conf parameter alation.feature_flags.enable_generic_nosql_support
to True.
Additionally, you can use the parameter alation.feature_flags.docstore_tree_table_depth to define the depth of the display (default is three levels).
For details about using alation_conf, refer to Using alation_conf.
Important
After changing values of these parameters, restart Alation Supervisor from the Alation shell:
alation_supervisor restart all.
Obtain the JDBC URI for Public Cloud
For Public Cloud CDP distribution, you must obtain the JDBC URI for configuration in Alation based on the type of distribution, namely Cloudera Data Warehouse (CDW) or Data Hub.
JDBC URI for Public Cloud CDW
A user with the DWUser Resource Role can obtain the JDBC hostname and port for the JDBC URI on the Cloudera Data Warehouse (CDW) web user interface. Perform these steps to obtain the JDBC URI:
On the Data Warehouses page, navigate to the Virtual Warehouses page on the left menu.
Locate the Impala instance for which you require the JDBC URI.
Click on the ellipses on extreme right of the Impala-DW instance.
Click Copy JDBC URL.
Paste the content in an editor of your choice and extract the hostname and port from the URL.
JDBC URI for Public Cloud Data Hub
A user with the EnvironmentUser Resource Role can obtain the JDBC hostname and port for the JDBC URI on the Cloudera Data Hubs web user interface.
On the Data Hubs page, locate and click on the Data Hub instance for which you require the JDBC URI.
On the Event History page, click Endpoints from the right menu of the last section.
The JDBC Hostname and Port are in the JDBC URI.
Obtain the HTTP Path for Public Cloud
You must obtain the HTTP Path for Public Cloud CDW and Data Hub distribution.
HTTP Path for Public Cloud CDW
A user with the DWUser Resource Role can obtain the JDBC hostname and port for the JDBC URI on the Cloudera Data Warehouse (CDW) web user interface. Perform these steps to obtain the JDBC URI:
On the Data Warehouses page, navigate to the Virtual Warehouses page on the left menu.
Locate the Impala instance for which you require the JDBC URI.
Click on the ellipses on extreme right of the Impala-DW instance.
Click Copy JDBC URL.
Paste the content in an editor of your choice and extract the HTTP Path from the URL from the
httpPathparameter.
HTTP Path for Public Cloud Data Hub
A user with the EnvironmentUser Resource Role can obtain the JDBC hostname and port for the JDBC URI on the Cloudera Data Hubs web user interface.
On the Data Hubs page, locate and click on the Data Hub instance for which you require the JDBC URI.
On the Event History page, click Endpoints from the right menu of the last section.
The HTTP Path is in the JDBC URI. Extract the value from the
httpPathparameter.
Prepare the Kerberos File
In case your Impala data source is kerberized, prepare the krb5.conf file and, if applicable, the keytab file for the service account. They will need to be uploaded to Alation.
For private cloud, consult your CDP admin as to locate and download the krb5.conf file.
For public cloud, perform these steps:
Go to /etc/krb5.conf on the Data Lake service and download the krb5.conf file.
Verify that there is no
includedircommand at the top of the file. If present, remove it.Go to the Data Lake environment in the CDP Console and click on the FreeIPA tab.
Open the downloaded krb5.conf file in an editor of your choice.
In the realms section, add two new fields, namely kdc and admin_server.
Use the FreeIPA hostname or IP you copied as the value for kdc and admin_server.
Example
[realms]
    CDP-AL13.C1N0-JTR4.CLOUDERA.SITE = {
    kdc = 10.13.105.196
    admin_server = 10.13.105.196
    pkinit_anchors = FILE:/var/lib/ipa-client/pki/kdc-ca-bundle.pem
    pkinit_pool = FILE:/var/lib/ipa-client/pki/ca-bundle.pem
Prepare for Metastore Connection for Public Cloud
To establish a metastore connection, you must obtain the hostname and port. Additionally, for Kerberos connection and Hadoop RPC, obtain the prepare the Kerberos file, Kerberos Principal and Hadoop RPC Protection, respectively.
Obtain the Metastore Hostname
A user with the EnvironmentUser Resource Role can obtain the Metastore hostname on the Cloudera Data Platform Environments List web user interface.
On the Environments / List page, locate and select the Data Warehouse environment.
On the Clusters page, select the Data Lake tab.
From the left menu, click Nodes.
The FQDN of the Master node is the Metastore hostname.
Obtain the Metastore Port
A user with the EnvironmentUser Resource Role can obtain the Metastore Port on the Cloudera Data Platform Environments List web user interface.
On the Environments / List page, locate and select the Data Warehouse environment.
On the Clusters page, select the Data Lake tab.
Click on the URL under CM URL in the Cloudera Manager Info section.
You are navigated to the Cloudera Manager (CM) user interface.
On the CM page, click Hive Metastore under the Status column.
Click on the Configuration tab.
Search for Hive Metastore Server Port in the Search field.
Copy the Metastore Port from the hive.metastore.port field.
Obtain Kerberos Principal
A user with the EnvironmentUser Resource Role can obtain the Kerberos Principal on the Cloudera Data Platform Environments List web user interface.
On the Environments / List page, locate and select the Data Warehouse environment.
On the Clusters page, select the Data Lake tab.
Click on the URL under CM URL in the Cloudera Manager Info section.
You are navigated to the Cloudera Manager (CM) user interface.
On the CM page, click Hive Metastore under the Status column.
Click on the Configuration tab.
Search for Kerberos Principal in the Search field.
Copy the Service name of the Kerberos Principal from the kerberos_princ_name field.
Kerberos Principal has the format <service-name>/<hostname>@<DOMAIN>. The <hostname> is the same as the metastore hostname
You can retrieve the <DOMAIN> from the [domain_realm] section of the Kerberos Configuration file.
Example
    [domain_realm]
        .TF91-AL.C1N0-JTR4.CLOUDERA.SITE = TF91-AL.C1N0-JTR4.CLOUDERA.SITE
         TF91-AL.C1N0-JTR4.CLOUDERA.SITE = TF91-AL.C1N0-JTR4.CLOUDERA.SITE

In this example, <DOMAIN> is *TF91-AL.C1N0-JTR4.CLOUDERA.SITE*.
Obtain the Hadoop RPC Protection
A user with the EnvironmentUser Resource Role can obtain the Hadoop RPC Protection on the Cloudera Data Platform Environments List web user interface.
On the Environments / List page, locate and select the Data Warehouse environment.
On the Clusters page, select the Data Lake tab.
Click on the URL under CM URL in the Cloudera Manager Info section.
You are navigated to the Cloudera Manager (CM) user interface.
On the CM page, click CORE_SETTINGS-* under the Status column.
Click on the Configuration tab.
Search for Hadoop RPC Protection in the Search field.
The Hadoop RPC Protection gets selected in the Hadoop.rpc.protection.
Prepare the SSL Certificate
If your connection from Alation will go over SSL, prepare the corresponding SSL certificate. Alation expects the file to be of JKS stroretype that can usually be found in the directory /var/lib/cloudera-scm-agent/agent-cert. Contact your CDP admin to locate and download the certificate.
Prepare for QLI for Private Cloud
To run Query Log Ingestion for an Impala data source, ensure that query logs are available on HDFS or Amazon S3.
Enable Audit for Impala
Enable the audit log for Impala. For specific details refer to documentation for your CDP version. Follow these generic guidelines:
Decide how many queries will be represented in each log file. Limiting the size manages disk space by archiving older logs and reduces the amount of text to process when analyzing activity for a particular period. Follow Impala documentation when configuring this aspect of Impala auditing.
Periodically pull audit logs from Impala coordinator nodes to HDFS. By default, the audit logs are located in the directory /var/log/impalad/audit/ inside Impala coordinator nodes. An admin can also configure a custom place for audit logs. In each environment, the location of the audit logs depends on the current audit log configuration.
Create a directory in HDFS or Amazon S3 for storing all Impala audit logs you want to be ingested into Alation, provided the HDFS service must be installed in the Cloudera Manager cluster.
The audit log files from each Impala coordinator node should stay in an HDFS subdirectory of the audit log directory. We recommend naming the subdirectory using the ID of the Impala coordinator node, for example, the IP address, or some other unique identifier.
You can automate the process by writing a script to pull audit logs from Impala coordinator nodes to HDFS and run it as a cron job every day.
Place Query Logs on HDFS for Private Cloud
Alation supports query log extraction from files located on HDFS and accessible through WebHDFS. Ensure that the HDFS service is installed on the Cloudera Manager cluster for Alation to access WebHDFS.
To set up QLI:
Make sure there are Impala audit event log files in the audit directories on Impala coordinator nodes that you want to track in Alation. The file names use the format:
impala_audit_event_log_1.0-*.Note
The default audit directory is /var/log/impalad/audit. However, your environment may be using a custom audit log directory. Look for the audit files in the audit directory that has been configured as the audit log directory in your CDP environment. To get the audit directory, select the Impala cluster in the CDP Manager, click on Configuration and search for Impala Daemon Audit Log Directory.
After confirming the files exist, create a directory on HDFS (example: /user/history/done), for example:
sudo -u hdfs hadoop fs -mkdir -p /user/history/done/log_1
The name of the directory can be anything you want. We named it
log_1in this example.After creating the log storage directory on HDFS, recursively modify the permission of the parent directory /done and its sub-directories with the following command:
sudo -u hdfs hadoop fs -chmod -R 744 /user/history/done
Copy the
impala_audit_event_log_1.0-*files into thelog_1directory, for example:hadoop fs -put impala_audit_event_log_1.0-* /user/history/done/log_1
As an alternative to the above steps that manually copy log files to a directory, you can use A.8 Impala QLI Script as an example of how to periodically copy the log file to the HDFS.
Place Query Logs on Amazon S3 for Private Cloud
Alation supports query log extraction from files located in an Amazon S3 bucket. You will need to provide an AWS access key and secret for an account that has Read permissions for this bucket when configuring QLI in Alation.
To set up QLI from Amazon S3:
Make sure there are Impala audit event log files in the audit directories on Impala coordinator nodes that you want to track in Alation. The file names use the format:
impala_audit_event_log_1.0-*.Note
The default audit directory is /var/log/impalad/audit. However, your environment may be using a custom audit log directory. Look for the audit files in the audit directory that has been configured as the audit log directory in your CDP environment. To get the audit directory, select the Impala cluster in the CDP Manager, click on Configuration and search for Impala Daemon Audit Log Directory.
Copy log file to the home directory.
cp impala_audit_event_log_1.0-* /home/<your_user>/
Download the log file to your local machine.
Upload the file to the S3 bucket that you can allow Alation to access. Grant read access to the service account.
Prepare for QLI for Public Cloud
Alation supports the these Public Cloud clusters:
Cloudera Data Warehouse (CDW)
Data Hub
CDW Cluster
Before you run Query Log Ingestion for an Impala data source for Public Cloud CDW cluster, ensure that query logs are available on Amazon S3.
Enable Impala Audit Logs for CDW
A user with the DWAdmin resource role can enable Impala Audit logs on the CDW web user interface. Perform these steps to enable audit logs:
On the Data Warehouses page, click Virtual Warehouses from the left menu.
Click on the Impala instance from where you want to enable the audit log.
Click on the Configurations tab.
Select the Impala Coordinator category.
From the Configuration files dropdown, select the
flagfileconfiguration file.Add the following configurations using the Add Custom Configuration button:
Key
Value
audit_event_log_dir
/opt/impala/logs/audit
max_audit_event_log_file_size
5000
Click Apply Changes to update the virtual warehouse.
The update may take a few minutes to complete.
Impala writes audit logs in the coordinator-0 pod of virtual warehouse in the Kubernetes Cluster. Verify that an audit file is generated the /opt/impala/logs/audit directory. The filename format is impala_audit_event_log_1_xxxxxxxxx.
Place Query Logs on S3 for CDW
Important
Ensure that you have access to the Kubernetes Cluster for the Virtual Warehouse. You can use any any Kubernetes client to access and modify Kubernetes pods. For example, kubectl.
In Public Cloud CDW, use Fluentd to place the audit files to Amazon S3 from the coordinator pod. You must update the Fluentd sidecar pod config file (profile-fluentd-config) stored in the ConfigMap from Impala virtual warehouse namespace. Using a Kubernetes client (kubectl), make the following changes in the ConfigMap:
Obtain the
profile-fluentd-configConfig Map content usingkubectland save it in a yaml file.
Create the directory for the configuration file.
mkdir <dir-name>

cd <dir-name>
Obtain the content and save it in a yaml file.
kubectl get configmaps -n <warehouse-namespace> profile-fluentd-config -o yaml >> profile-fluentd-config.yamlOpen the file using an editor of your choice.
Duplicate the <source> tag.
<source>
    @type                         tail
    path                          /opt/impala/logs/profiles/*
    pos_file                      /opt/impala/logs/profiles.pos
    tag                           impala_profiles.*
    <parse>
        @type                       none
    </parse>
    read_from_head                true
    skip_refresh_on_startup       true
    limit_recently_modified       24h
    refresh_interval              1s
</source>
Modify the content of the duplicated <source> tag as shown below:
<source>
    @type                         tail
    path                          /opt/impala/logs/audit/*
    pos_file                      /opt/impala/logs/audit.pos
    tag                           impala_audit.*
    <parse>
        @type                       none
    </parse>
    read_from_head                true
    skip_refresh_on_startup       true
    limit_recently_modified       24h
    refresh_interval              1s
</source>
Duplicate the <match> tag.
<match impala_profiles.**>
    @type                         s3
    @id                           out_s3
    log_level                     debug
    s3_bucket                     "#{ENV['S3_BUCKET_NAME']}"
    s3_region                     "#{ENV['S3_BUCKET_REGION']}"
    s3_object_key_format          %{path}clusters/env-dmb98f/warehouse-1713958196-r5j8/warehouse/tablespace/external/hive/sys.db/logs/dt=%Y-%m-%d/ns=impala-1713959890-nl9w/app=impala-profiles/%{time_slice}_%{index}_profile.log.gz
    time_slice_format             %Y-%m-%d-%H-%M
    store_as                      gzip
    <buffer time>
        @type                       file
        path                        /var/log/fluentd-buffers/s3 # directory under which buffer file is created
        chunk_limit_size            256m
        timekey                     60s
        timekey_use_utc             true
        flush_interval              3
        flush_mode                  interval
        flush_thread_count          8
        flush_at_shutdown           true
    </buffer>
    <format>
        @type single_value
        message_key                  message
    </format>
</match>
Modify the content of the duplicated <match> tag as shown below:
<match impala_audit.**>
    @type                         s3
    @id                           audit_s3
    log_level                     debug
    s3_bucket                     "#{ENV['S3_BUCKET_NAME']}"
    s3_region                     "#{ENV['S3_BUCKET_REGION']}"
    s3_object_key_format          %{path}clusters/env-dmb98f/warehouse-1713958196-r5j8/impala_audit/dt=%Y-%m-%d/ns=impala-1713959890-nl9w/app=impala-audit/impala_audit_event_log_%{time_slice}
    time_slice_format             %Y-%m-%d-%H-%M
    store_as                      file
    <buffer time>
        @type                       file
        path                        /var/log/fluentd-buffers/audit/s3 # directory under which buffer file is created
        chunk_limit_size            256m
        timekey                     3600s
        timekey_use_utc             true
        timekey_wait                10m
        flush_interval              300
        flush_mode                  interval
        flush_thread_count          8
        flush_at_shutdown           true
    </buffer>
    <format>
        @type                       single_value
        message_key                 message
    </format>
</match>
Also, add a
timekey_waitparameter to the <match>.<buffer> tag:<match impala_audit.**> ... <buffer time> ... timekey_wait 10m ... </buffer> ... </match>Apply the changes to the ConfigMap:
kubectl apply -f profile-fluentd-config.yamlUpdate the Impala coordinator by deleting the coordinator pods:
kubectl delete -n <impala-namespace> pod coordinator-0

kubectl delete -n <impala-namespace> pod coordinator-1
Kubernetes recreates the pods using the latest configuration files.
Verify that the pods are running:
kubectl get pod -n <impala-namespace>The audit logs for queries executed after Kubernetes recreated the pods with the modified configuration file are forwarded to Amazon S3.
Data Hub
Before you run Query Log Ingestion for an Impala data source for Public Cloud Data Hub cluster, ensure that query logs are available on HDFS or Amazon S3.
Enable Impala Audit Logs for Data Hub
A user with the EnvironmentUser resource role can enable Impala Audit logs. Perform these steps to enable audit logs:
In the Data Hub cluster, locate the Cloudera Manager Info section and click on the URL under CM URL.
You are redirected to the Cloudera Manager for the cluster.
On the Home page of the Cloudera Manager, click impala on the Compute Cluster table.
Click on the Configuration tab from the Impala status page.
Search for Impala Daemon Audit Log Directory on search bar and note down the field value.
If no value is set, enter /var/log/impalad/audit in the field.
Search for Impala Daemon Maximum Audit Log File Size on the search bar and note down the field value.
If no value is set, enter 5000 in the field.
Save the configuration and restart the Impala service, if required.
Place Query Logs on Amazon S3 for Data Hub
Important
Ensure that you have access to the file system of the Data Hub cluster’s coordinator node and have EnvironmentUser resource role. To access the coordinator node with SSH, you must have the SSH key file and the coordinator node URL.
To obtain the coordinator node URL, perform these steps:
Go to the Data Hub cluster page.
Click Nodes from the left menu.
Click Coordinator and copy the FQDN of the Coordinator node.
To place the log files on Amazon S3, perform these steps:
Using SSH, connect to the Coordinator node for the cluster.
Log in as a
rootuser:sudo su -
Change the current directory to the value set for the Impala Daemon Audit Log Directory. For example: /var/log/impalad/audit.
cd /var/log/impalad/audit
Verify that at least one impala audit file is present in the audit directory.
Example of a file is: impala_audit_event_log_1.0-1669280594785.
Download the log file into your local file system and upload it to an Amazon S3 bucket.