Version 3.9.0 or Newer
Alation Cloud Service Applies to Alation Cloud Service instances of Alation
Customer Managed Applies to customer-managed instances of Alation
Important
In version 3.9.0, Alation has redesigned the user interface of the Metadata Extraction tab. The new interface will be available if you install or upgrade the connector on Alation version 2023.3.5 or newer.
Overview
Metadata extraction (MDE) is the process of fetching file system information, such as files and columns. Alation queries your database to retrieve this metadata, which becomes catalog objects. You can initiate MDE on demand or schedule it for regular catalog updates.
Configure MDE in Alation
Metadata extraction (MDE) reads S3 inventory reports to extract buckets, folders and files. Alation will retrieve this metadata, which will become catalog objects. You can initiate MDE on demand or schedule it for regular catalog updates. Optionally, you can use column extraction and incremental extraction based on your requirements.
Note
Folders at the last level of a directory that have no name and are empty cannot be extracted.
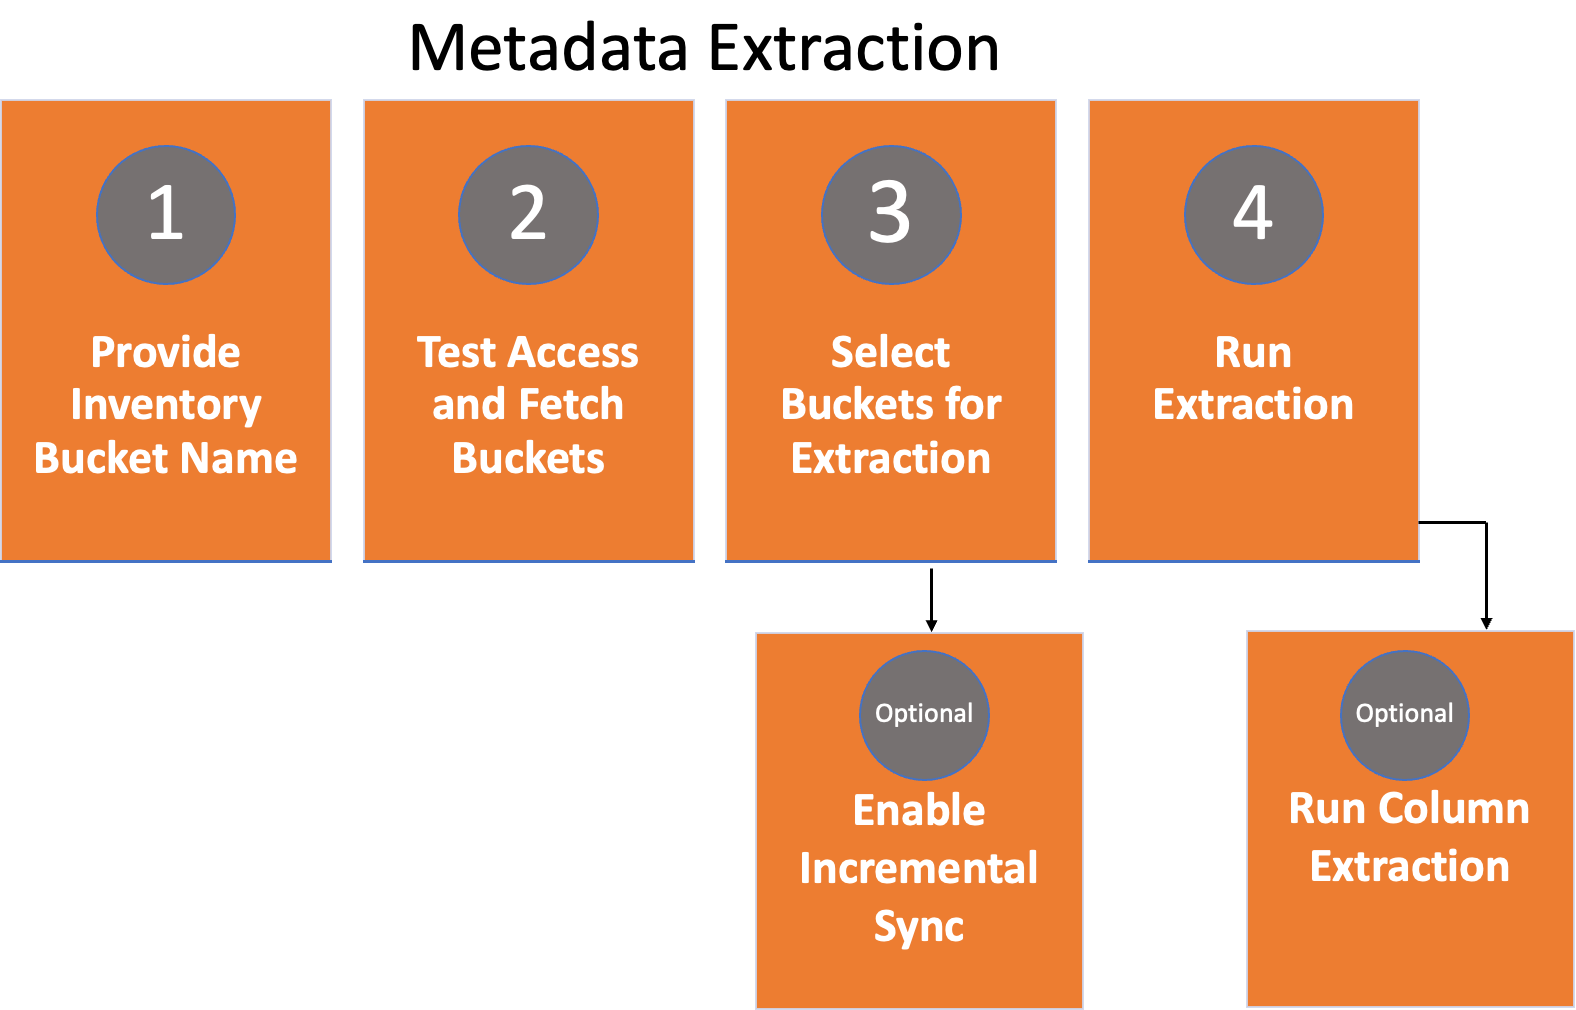
Steps involved in metadata extraction are:
Important
The Alation user interface displays standard configuration settings for credentials and connection information stored in the Alation database. If your organization has configured Azure KeyVault or AWS Secrets Manager to hold such information, the user interface will change to include the following buttons adjacent to the respective fields:

By default, you see the user interface for Standard. In the case of Vault, instead of the actual credential information, you must select the source and provide the corresponding key. For details, see Configure Secrets for OCF Connector Settings.
Provide Inventory Bucket Name
Note
When you run MDE, the Amazon S3 OCF connector obtains the list of inventory files from the latest manifest.json file for the respective bucket. Manifest files are available at the following location in the inventory bucket:
destination-prefix/source-bucket/config-ID/YYYY-MM-DDTHH-MMZ/manifest.json
For more information about manifest.json file, refer to Inventory manifest in AWS documentation.
To provide the bucket name, perform these steps:
On the Settings page of Amazon S3 file system source, go to the Metadata Extraction tab.
In the Step 1:Provide inventory bucket name section, provide the name of the destination bucket that hosts the inventory reports.
Click Save.
Note
The wait time is 24 to 48 hours for the first inventory report to be generated once the inventory function is set. If you run MDE before the inventory report generation then Alation will not extract any data.
Test Access and Fetch Buckets
Before fetching the datasets for extraction, Alation tests if the user account has the required permissions to run metadata extractions.
Perform these steps to test access and fetch buckets:
On the Settings page of Amazon S3 file system source, go to the Metadata Extraction tab.
In the Step 1: Test access and Fetch buckets section, provide the name of the destination bucket that hosts the inventory reports.
Click Run.
The retrieved list of buckets appear in the Buckets table under the Select buckets for extraction section of the Metadata Extraction page.
Select Buckets for Extraction
Select buckets for extraction, to which you have access, instead of extracting all the buckets. When selecting buckets for extraction, you retrieve the metadata only for the selected buckets. This makes the extraction quicker and consumes fewer resources than extracting all the buckets.
By default, all the buckets Alation fetches from the file system source are selected for extraction. You can adjust the selection of by:
Selecting Buckets Using Filters
Selecting Buckets Manually
Important
If you do not select any bucket manually or using filters, Alation extracts all the buckets when you run the metadata extraction.
Select Buckets Using Filters
If you want to apply extraction filters, perform these steps:
On the Settings page of your Amazon S3 file system source, go to the Metadata Extraction tab.
Under the Select buckets for extraction section, turn on the Enable advanced settings toggle.
Select the required extraction filter option from the Extract drop down:
Only selected buckets — Extracts metadata only from the selected buckets. This is the default value.
All buckets except selected — Extracts metadata from all buckets except the selected buckets.
To delete the buckets from previous extraction that are not part of the current bucket selection, select the Keep the catalog synchronized with the current selection of buckets checkbox.
Create a filter.
From the first drop down, select Bucket.
Select the filter criteria (Contains, Starts with, Ends with, Regex).
Specify the keyword to look for from the bucket.
Use this option if you frequently change buckets or if you use extensive metadata.
You can add multiple filters by clicking the Add another filter link.
Note
You must use rules if you plan to schedule MDE.
Click Apply filters.
The Buckets table displays the selected buckets that match the rules that you had set.
Note
After applying rules, you cannot manually adjust the selection of buckets.
Select Buckets Manually
If you opt to manually select the buckets for extraction, perform these steps:
On the Settings page of your Amazon S3 file system source, go to the Metadata Extraction tab.
Under the Select buckets for extraction section, turn off the Enable advanced settings toggle, if not disabled already.
Select the required datasets from the list in the Buckets table.
Alternatively, you can select a bucket by searching for the specific bucket from the table using either the bucket name or any keyword or string in the bucket name.
After you have selected the buckets, your selection count is displayed on top of the Buckets table.
Enable Incremental Sync
Note
This is Optional.
For more information, see Set Up Incremental MDE
Run Extraction
Under the Run extraction section (General Settings > Metadata Extraction), click Run Extraction now to extract metadata on demand. By default, if you don’t select any buckets in the Select buckets for extraction step, Alation extracts metadata for all buckets.
The status of the extraction action is logged in the Extraction job status table under the Job History tab.
Schedule Extraction
You can also schedule the extraction. To schedule the extraction, perform these steps:
On the Settings page of your Amazon S3 file system source, go to the Metadata Extraction tab.
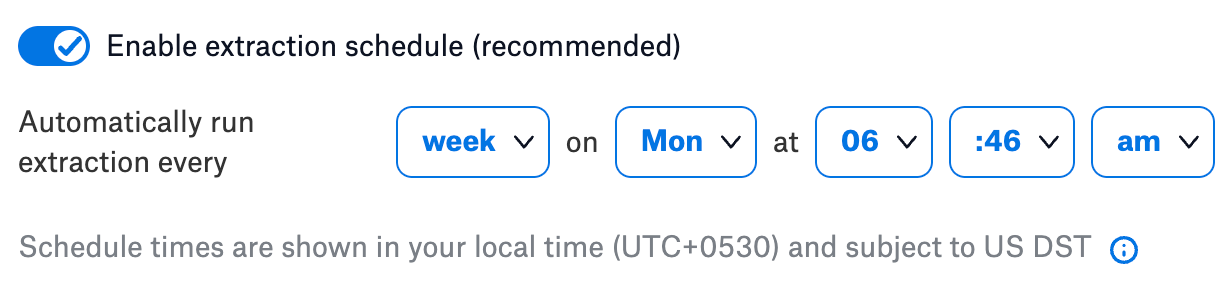
Under the Run extraction section, turn on the Enable extraction schedule toggle.
Using the date and time widgets, select the recurrence period and day and time for the desired MDE schedule. The next metadata extraction job for your file system source will run on the schedule you have specified.
Note
Here are some of the recommended schedules:
Schedule extraction to run for every 12 hours at the 30th minute of the hour.
Schedule extraction to run for every 2 days at 11:30 PM.
Schedule extraction to run every week on the Sunday and Wednesday of the week.
Schedule extraction to run for every 3 months on the 15th day of the month.
View the MDE Job History
You can view the status of the extraction actions after you run the extraction or after Alation triggers the MDE as per the schedule. Also, you can view the status of the buckets retrieved from the Test Access and Fetch datasets step.
To view the status of extraction, go to Metadata Extraction > Job History on the Settings page of your amazon S3 OCF file system source. The Extraction job status table is displayed.
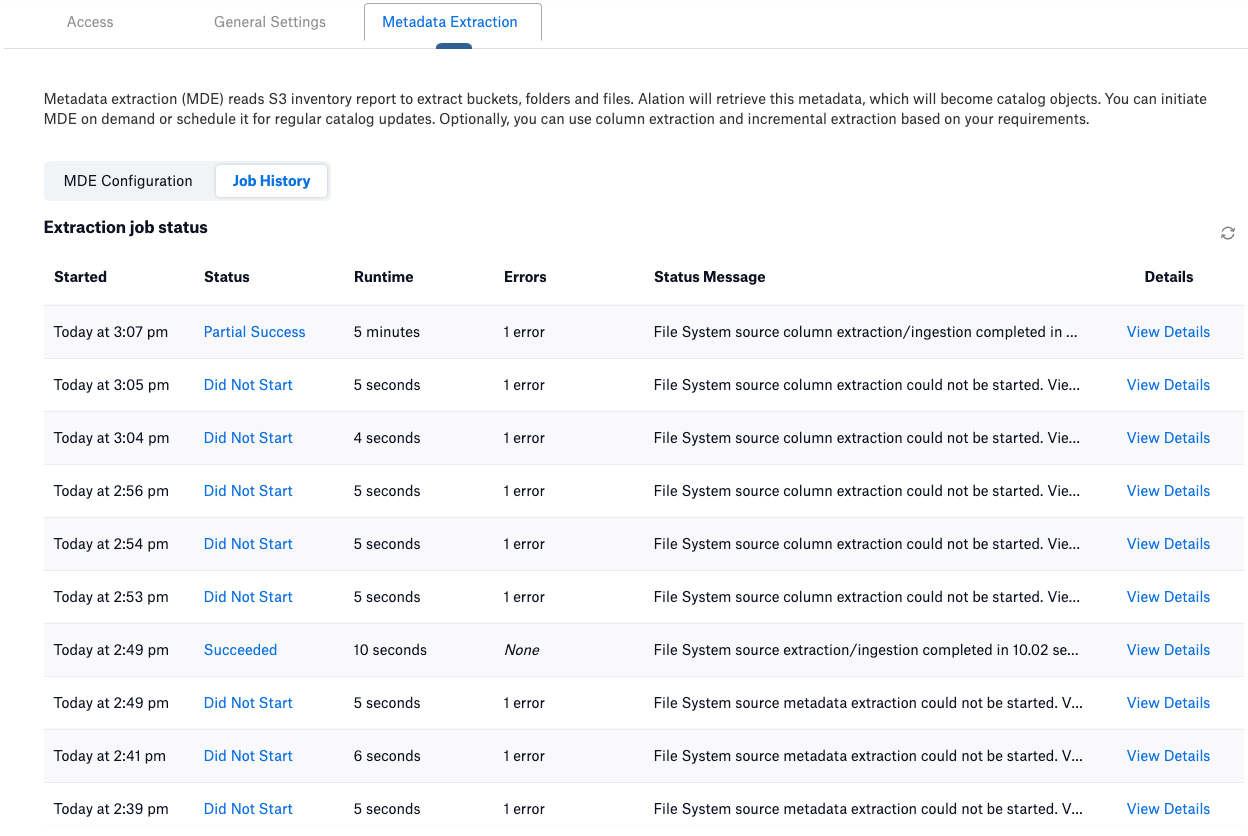
The Extraction job status table logs the following status:
Did Not Start - Indicates that the metadata extraction did not start due to configuration or other issues.
Succeeded - Indicates that the extraction was successful.
Partial Success - Indicates that the extraction was successful with warnings. If Alation fails to extract some of the objects during the metadata extraction process, it skips them and proceeds with the extraction process, resulting in partial success.
Skipped - Indicates that the job was skipped as the previous extraction job was not completed.
Failed - Indicates that the extraction failed with errors.
Click the View Details link to view a detailed report of metadata extraction. If there are errors, the Job errors table displays the error category, error message, and a hint (ways to resolve the issue). Follow the instructions under the Hints column to resolve the error.
In some cases, the Generate Error Report link is displayed above the Job errors table. Click the Generate Error Report link to generate an archive (.zip) containing CSV files for different error categories, such as Data and Connection errors. Click Download Error Report to download the files.
Run Column Extraction
Note
This is optional. Ensure that the MDE is successfully completed before performing column extraction.
After you successfully complete the Metadata Extraction, you can additionally extract the column information for CSV, PSV, TSV, and Parquet files already cataloged in Alation. Column extraction enables file sampling.
A column extraction job extracts and catalogs column headers found in semi-structured file formats, such as Parquet, CSV, PSV, and TSV.
Note
Column extraction is a time consuming operation due to the nature of processing as it involves reading individual files.
To run column extraction, perform these steps:
On the Settings page of your Amazon S3 file system source, go to the Metadata Extraction tab.
Expand the Column extraction section, and provide the following information:
Parameter
Description
CSV File Delimiter
Select the CSV file delimiter within all the CSV files in the file system source from the dropdown. The default delimiter value is COMMA.
Use Schema Path Pattern
Turn on the Use Schema Path Pattern toggle to extract columns only at the folder level.
When the Use Schema Path Pattern is turned on, the Column extraction job does not match any individual CSV, PSV, TSV, or Parquet files. It will only match the files which are valid for given schema path pattern.
Schema Path Pattern
Provide the Schema Path Pattern for schema extraction. For more information, refer to Schema Path Pattern.
Click Save.
Click Run column extraction.
You can view the status of column extraction in the Extraction job status table under the Job History tab.