Azure Databricks OCF Connector: Query Log Ingestion
Alation Cloud Service Applies to Alation Cloud Service instances of Alation
Customer Managed Applies to customer-managed instances of Alation
Query log ingestion (QLI) is supported for both standard and high concurrency Databricks clusters.
Alation offers two approaches to QLI configuration for Azure Databricks:
File-based QLI (recommended)—You will need to place the Databricks logs in a container under an Azure Storage account. Alation connects to the storage account to retrieve, parse, and ingest the query history information from the logs.
Table-based QLI—You will need to off-load the Databricks logs into a dedicated directory on the Databricks File System (DBFS) or Azure Storage and create an external table and a view on top of the table. Alation will query the view to retrieve query history into the catalog.
QLI configuration includes steps in Azure Databricks and Alation. Follow this path:
Review and fulfill the Prerequisite.
Prerequisite
The prerequisite is mandatory for file-based QLI and optional for table-based QLI.
For file-based QLI, you must provide storage on Azure Storage for raw Databricks logs to be written to. You will need to mount the storage container onto DBFS. This makes the logs accessible for Alation to extract. See Supported Azure Storage Types.
For table-based QLI, you can either use DBFS to store the logs or choose to store them externally on Azure Storage by creating a mount. Even if you choose to create a mount, you won’t need to provide access to the Azure Storage account to Alation. In case of table-based QLI, Alation does not directly access log files. It will query a dedicated view that you create as part of the configuration.
Supported Azure Storage Types
Alation supports these storage types:
Azure Blob Storage
Azure Data Lake Storage Gen 2
Azure Data Lake Storage Gen 1
We recommend creating a separate dedicated container under a storage account that you have access to for storing the Databricks logs. Collect the connection information for your storage account before configuring QLI in Alation. You will need different information, depending on the storage account type.
Azure Blob Storage or Azure Data Lake Storage Gen 2
For Blob Storage or Azure Data Lake Storage Gen 2 account types, Alation supports authentication with access keys or shared access signatures. Authentication via a service principal is currently not supported.
Prepare the following authentication information for configuration of QLI in Alation:
Storage account name
Access key or shared access signature
Container name
Storage endpoint suffix
Azure Data Lake Storage Gen 1
For Azure Data Lake Storage Gen1 storage accounts, authentication goes via a service principal.
Prepare the following authentication information for configuration of QLI in Alation:
Azure Data Lake Storage URI
Tenant ID
Client ID
Client secret
Storage endpoint suffix
Enable Logging in Databricks
QLI configuration requires logging to be enabled on your Databricks cluster.
Warning
Databricks has deprecated init scripts stored on DBFS. Alation previously recommended storing the init script for enabling the logs on DBFS:
If you previously configured QLI, you must recreate the init script that enables logging to be stored as a workspace file. Refer to Recreate Databricks Logging Script Under Workspace.
If you are initially setting up QLI for an Azure Databricks data source, follow the steps below.
Perform these steps to enable logging in Databricks. As a result of this configuration, you will set up the log path directory, enable the DEBUG-level logs, and set a pattern in which logs will be written.
To set up the logs directory:
If you are configuring file-based QLI, you must mount external storage on Azure Storage to DBFS, as Alation cannot reach DBFS directly to read the log files.
Note
If you are configuring table-based QLI, mounting external storage is optional. You can use an internal cluster log path. If you do not wish to create any mounts, skip this step and go to step 2.
We’ll use an example for a Blob Storage account accessible with the access key. Use the template below to write the mounting script and test it. Replace the placeholder values with real values:
<container-name>—Name of the Blob container that you created under a Blob Storage account to store the logs.<storage-account-name>—Name of your Azure Storage account.<mount-name>—Name of the mount. You can use the container name to name your mount or use another name.<access-key>—Access key for the storage account.
# Databricks notebook source
# COMMAND ----------
# Set up Mount
dbutils.fs.mount(
  source = "wasbs://<container-name>@<storage-account-name>.blob.core.windows.net",
  mount_point = "/mnt/<mount-name>",
  extra_configs = {"fs.azure.account.key.<storage-account-name>.blob.core.windows.net":"<access-key>"})

# COMMAND ----------
# Test Mount
dbutils.fs.ls("/mnt/<mount-name>")

# COMMAND ----------
# Test write to Mount - Check in Azure Portal
dbutils.fs.put("/mnt/<mount-name>/test.txt", "this is a test")

# COMMAND ----------
# Clean up test
dbutils.fs.rm("/mnt/<mount-name>/test.txt")
In the Databricks user interface, go to the Configuration tab for your cluster, and expand Advanced Options.
Open the Logging tab.
Specify Destination and Cluster Log Path:
Select
DBFSas Destination.Set Cluster Log Path to your log storage directory:
For a mounted directory, use format
dbfs:/mnt/<mount-name>Example:
dbfs:/mnt/azdb-databricks-logsNote
You don’t need to specify the cluster ID when editing the path. It will be auto-appended when you save your input.
For an internal DBFS path, use format
dbfs:/<directory-name>Example:
dbfs:/cluster-logsNote
You can only use an internal DBFS path if you are going to configure table-based QLI. You cannot use it for file-based QLI.
Click Confirm to save the value.
Next, you will enable logging. Alation recommends using an init script that will automatically run when the cluster is restarted. You can add the script via the Databricks user interface.
Note
If you cannot use an init script, you can alternatively enable logging using a non-init Python or Scala script and run it every time you restart the cluster. See Enable Logging Using a Regular Script below.
To enable logging:
Go to your workspace and create a new folder, for example,
alation_init_scripts.Note
You can give the new folder any name. We’re using
alation_init_scriptsas an example.Set the permissions on the folder to be Can Manage for Admins.
Note
We recommend restricting the permissions to Admins only to ensure that unauthorized users cannot manage this folder and modify the init script.
Create a new file, for example
alation_qli_init_sript.sh. Ensure you use the .sh extension.Copy the script given below in the file you created and review the contents to ensure there are no extra spaces or line breaks that could have been accidentally added while copy-pasting.
#!/bin/bash
echo "Executing Init script for Alation QLI"
echo "Executing on Driver:"
LOG4J_PATH="/home/ubuntu/databricks/spark/dbconf/log4j/driver/log4j2.xml"
echo "Adjusting log4j2.xml here: ${LOG4J_PATH}"
sed -i '0,/<PatternLayout pattern="%d{yy\/MM\/dd HH:mm:ss} %p %c{1}: %m%n%ex"\/>/s//<PatternLayout pattern="%d{yyyy-MM-dd HH:mm:ss.SS} [%t] %p %c{1}: %m%n"\/>/' ${LOG4J_PATH}
sed -i 's/<\/Loggers>/<Logger name="org.apache.spark.sql.execution.SparkSqlParser" level="DEBUG"\/><\/Loggers>/' ${LOG4J_PATH}
#!/bin/bash
echo "Executing on Driver: $DB_IS_DRIVER"
if [[ $DB_IS_DRIVER = "TRUE" ]]; then
LOG4J_PATH="/home/ubuntu/databricks/spark/dbconf/log4j/driver/log4j.properties"
else
LOG4J_PATH="/home/ubuntu/databricks/spark/dbconf/log4j/executor/log4j.properties"
fi
echo "Adjusting log4j.properties here: ${LOG4J_PATH}"
echo "log4j.logger.org.apache.spark.sql.execution.SparkSqlParser=DEBUG" >> ${LOG4J_PATH}
echo "log4j.appender.publicFile.layout.ConversionPattern=%d{yyyy-MM-dd HH:mm:ss.SS} [%t] %p %c{1}: %m%n" >> ${LOG4J_PATH}""", True)
Configure the cluster to run the init script. Follow these steps in Databricks documentation: Configure a cluster-scoped init script using the UI.
Restart the cluster.
Alation does not process active logs. It only ingests archived log files in the .log.gz format. There is a delay between writing contents to a log file and converting the log file into a compressed .log.gz file. Before you run QLI in Alation, ensure that your log storage container or the DBFS directory has archived logs.
Next, configure file-based QLI or table-based QLI:
Enable Logging Using a Regular Script
If for some reason you cannot use init scripts on your cluster, you can use a regular script to enable logging.
Open a Databricks Scala notebook.
Copy the contents of the Scala script below to enable DEBUG query logs that contain SQL queries and set the pattern in which logs have to show up. This Scala script should be run whenever the cluster is started or restarted.
%scala
import org.apache.logging.log4j.LogManager
import org.apache.logging.log4j.core.LoggerContext
import org.apache.logging.log4j.core.config.{Configuration, LoggerConfig}
import org.apache.logging.log4j.core.config.Configurator
import org.apache.logging.log4j.Level
import org.apache.logging.log4j.core.layout.PatternLayout
import org.apache.logging.log4j.core.appender.RollingFileAppender;
import org.apache.logging.log4j.core.appender.RollingFileAppender.Builder;
import org.apache.logging.log4j.core.filter.AbstractFilterable;
import org.apache.logging.log4j.core.config.AppenderRef;
import org.apache.logging.log4j.core.appender.rewrite.RewriteAppender;
import com.databricks.logging.ServiceRewriteAppender;
import org.apache.logging.log4j.core.config.AbstractConfiguration;

Configurator.setRootLevel(Level.DEBUG);

val ctx =  LogManager.getContext(false).asInstanceOf[LoggerContext];
val conf = ctx.getConfiguration();
val layout = PatternLayout.newBuilder()
      .withConfiguration(conf)
      .withPattern("%d{yyyy-MM-dd HH:mm:ss.SS} [%t] %p %c{1}: %m%n")
      .build();

val rollingFileAppender = conf.getAppenders().get("publicFile.rolling").asInstanceOf[RollingFileAppender];
val appenderBuilder: RollingFileAppender.Builder[_] = RollingFileAppender.newBuilder();
appenderBuilder.setConfiguration(conf)
appenderBuilder.setName(rollingFileAppender.getName())
appenderBuilder.setLayout(layout)
appenderBuilder.withFileName(rollingFileAppender.getFileName())
appenderBuilder.withFilePattern(rollingFileAppender.getFilePattern())
appenderBuilder.withPolicy(rollingFileAppender.getTriggeringPolicy())
appenderBuilder.setBufferedIo(false)
appenderBuilder.setBufferSize(rollingFileAppender.getManager().getBufferSize())
appenderBuilder.setImmediateFlush(rollingFileAppender.getImmediateFlush())
appenderBuilder.withCreateOnDemand(rollingFileAppender.getManager().isCreateOnDemand())
val appender = appenderBuilder.build();

val appenderRef = Array(AppenderRef.createAppenderRef(appender.getName(), null, null));
var policy = new ServiceRewriteAppender();

val rewriteAppender = conf.getAppenders().get("publicFile.rolling.rewrite").asInstanceOf[RewriteAppender];
val updatedRewriteAppender = RewriteAppender.createAppender(rewriteAppender.getName(), String.valueOf(rewriteAppender.ignoreExceptions()), appenderRef, conf, policy, rewriteAppender.getFilter());

rollingFileAppender.stop();
rewriteAppender.stop();

val config = ctx.getConfiguration().asInstanceOf[AbstractConfiguration];
config.removeAppender(rollingFileAppender.getName());
config.removeAppender(rewriteAppender.getName());

conf.addAppender(appender);
conf.addAppender(updatedRewriteAppender);
appender.start();
updatedRewriteAppender.start();

conf.getRootLogger().addAppender(updatedRewriteAppender, null, null);
ctx.updateLoggers();
Open a Databricks Python notebook.
Copy the contents of the Python script below to enable DEBUG query logs that contain SQL queries and set the pattern in which logs have to show up. This Python script should be run whenever the cluster is started or restarted.
log4j = spark.sparkContext._jvm.org.apache.log4j
log4j.LogManager.getRootLogger().setLevel(log4j.Level.DEBUG)
ca = log4j.LogManager.getRootLogger().getAppender("publicFile")
ca.setLayout(log4j.PatternLayout("%d{yyyy-MM-dd HH:mm:ss.SS} [%t] %p %c{1}: %m%n"));
Next, configure file-based QLI or table-based QLI:
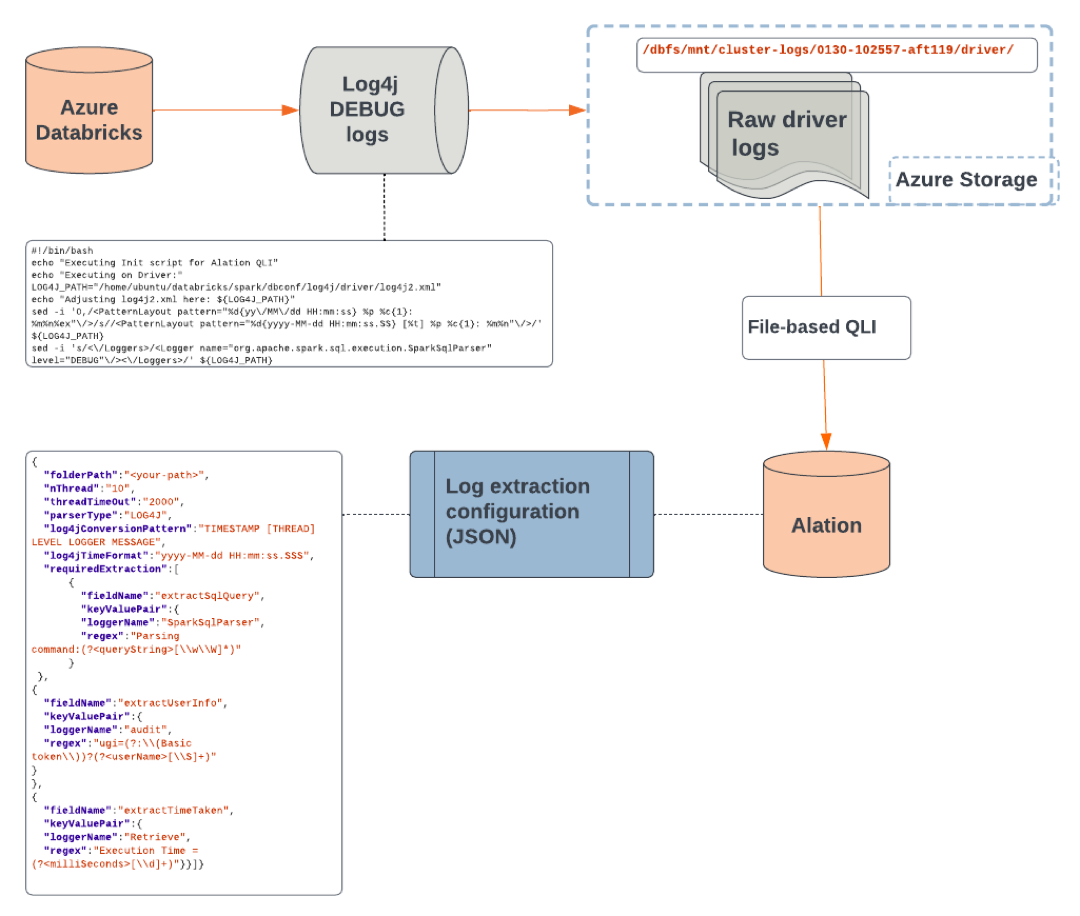
Configure File-Based QLI
File-based QLI is a configuration where Alation will connect to Azure Storage and read and process raw driver logs stored in a container. The logs are parsed based on a log extraction template in the JSON format. You create the JSON content as part of the configuration in Alation (described below).
File-based QLI flowchart
To set up file-based QLI:
In Alation, open the Settings page of your Azure Databricks OCF data source.
Open the Query Log Ingestion tab.
Under Connector Settings and Query Log Ingestion Type, select the File based query log ingestion radio button.
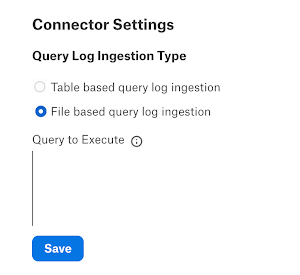
Click Save in this section.
Below the Connector Settings section, locate section File Based Log Query Log Ingestion. Select the appropriate storage type:
Azure Blob Storage—Select this radio button if your log storage container is under a Blob Storage or an Azure Data Lake Storage Gen 2 account.
ADLS—Select this radio button if your log storage container is under an Azure Data Lake Storage Gen 1 account.
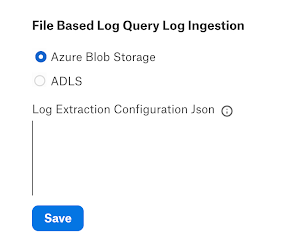
Next, you will need to fill in the Log Extraction Configuration JSON field. Use the template given below.
In your JSON content, change the value of the
<your-path>key to the path to the folder that stores the logs in the Azure Storage container, for example:/cluster-logs/0130-102557-aft119/driver/Where:
/cluster-logsis the subfolder in the Azure Storage container.0130-102557-aft119is your cluster ID./driver/is the auto-created directory that stores the log files that Alation will process.
Note
If the logs are ingested from different clusters, provide the parent folder
/cluster-logsas the folder path.Log Extraction Configuration JSON
{
  "folderPath":"<your-path>",
  "nThread":"10",
  "threadTimeOut":"2000",
  "parserType":"LOG4J",
  "log4jConversionPattern":"TIMESTAMP [THREAD] LEVEL LOGGER MESSAGE",
  "log4jTimeFormat":"yyyy-MM-dd HH:mm:ss.SSS",
  "requiredExtraction":[
      {
        "fieldName":"extractSqlQuery",
        "keyValuePair":
        {
          "loggerName":"SparkSqlParser",
          "regex":"Parsing command:(?<queryString>[\\w\\W]*)"
        }
      },
      {
        "fieldName":"extractUserInfo",
        "keyValuePair":
        {
          "loggerName":"audit",
          "regex":"ugi=(?:\\(Basic token\\))?(?<userName>[\\S]+)"
        }
      },
      {
        "fieldName":"extractTimeTaken",
        "keyValuePair":
        {
          "loggerName":"Retrieve",
          "regex":"Execution Time = (?<milliSeconds>[\\d]+)"
        }
      }
  ]
}
Note
For more information about this JSON template and the available customization options, refer to the topic that explains the concept of File-Based Query Log Ingestion.
Click Save in this section.
Depending on the type of your storage account, configure access to logs in the respective section of the General Settings tab:
Configure Azure Blob Storage Connection—Specify information in the Configure Azure Blob Storage Connection section if you are storing the logs under a Blob Storage or an Azure Data Lake Storage Gen 2 account.
Configure ADLS Connection—Specify information in the Configure ADLS Connection section if you are storing the logs under an Azure Data Lake Storage Gen 1 account.
Configure Azure Blob Storage Connection
The section Configure Azure Blob Storage Connection applies to both Blob Storage and Azure Data Lake Storage Gen 2 accounts. The user interface currently does not differentiate between these storage account types.
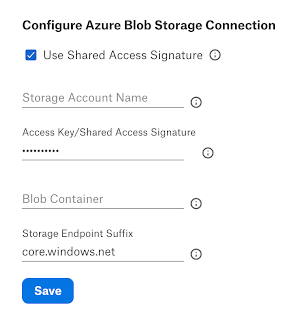
Specify the Blob Storage or Azure Data Lake Storage Gen 2 account authentication details and save the information by clicking Save.
Parameter |
Description |
|---|---|
Use Shared Access Signature |
Select this checkbox to use the shared access signature for authentication. Leave it clear if using an access key. |
Storage Account Name |
Specify the storage account name. |
Access Key/Shared Access Signature |
Paste the shared access signature if the Use Shared Access Signature checkbox is selected. If using an access key, paste the access key. |
Blob Container |
Specify the Blob container name. |
Storage Endpoint Suffix |
Specify the storage endpoint suffix according to the data source:
|
Configure ADLS Connection
Under the Configure ADLS Connection section, specify the authentication information for an Azure Data Lake Storage Gen 1 account and save the information by clicking Save.
Parameter |
Description |
|---|---|
ADLS URI |
Specify the ADLS URI. |
Tenant ID |
Specify the tenant ID. |
Client ID |
Specify the client ID. |
Client Secret |
Specify the client secret. |
Storage Endpoint Suffix |
Specify the storage endpoint suffix with the following suffix according to the data source:
|
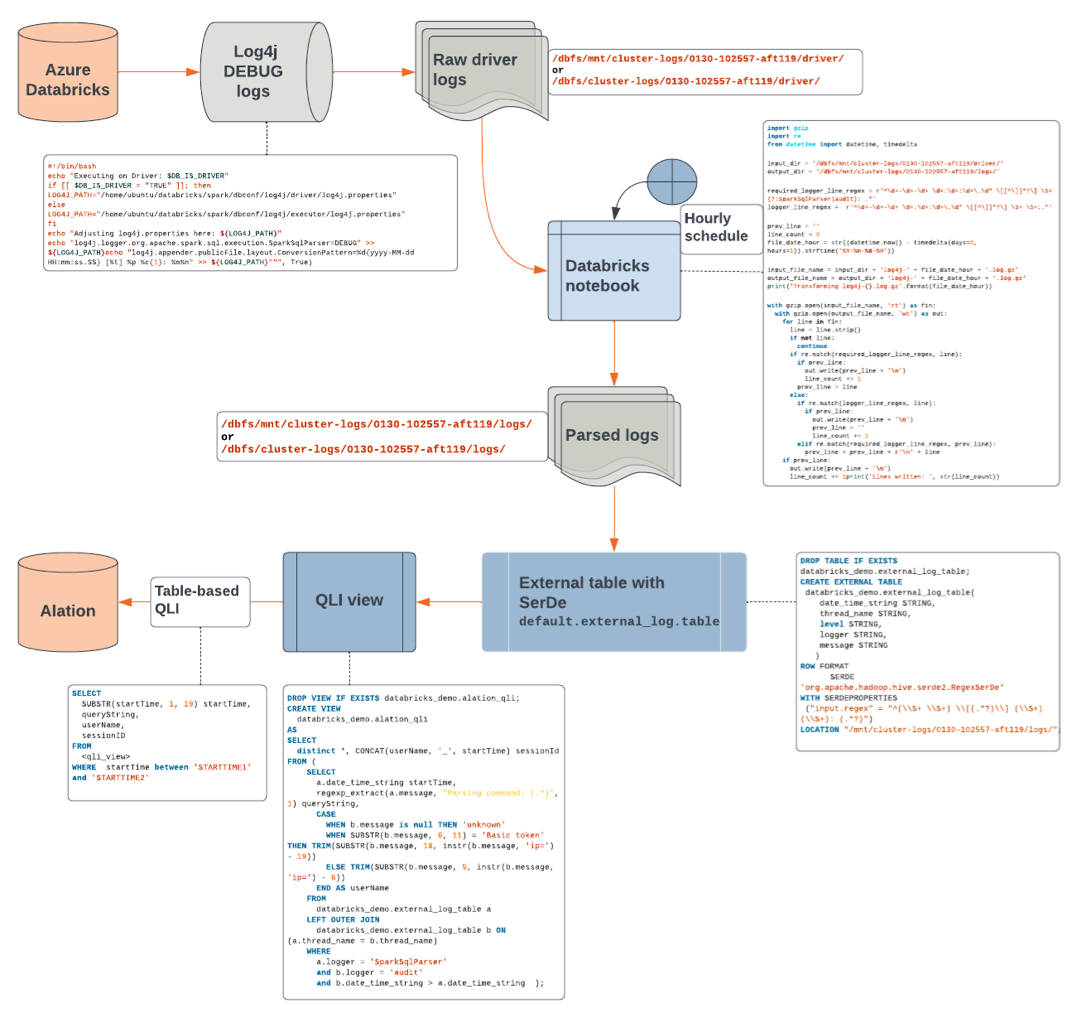
Configure Table-Based QLI
The table-based QLI method uses an external table that is created based on the Databricks logs and a view on top of this table.
You will need to create a log output directory in the cluster log path and run a script that will lift the logs from the logs storage directory, parse them, and store them in the log output directory. After that, you will create an external table from the log output directory and a view on top of the table. Alation will read the view to extract query history.
Note
For more information on external tables in Databricks, refer to the corresponding Databricks documentation.
Table-based QLI flowchart
Configuration in Databricks
To configure table-based QLI:
Ensure that you have enabled logging: Enable Logging in Databricks.
In Databricks, create an additional output directory,
logs, in the cluster log directory. This directory will be used to write the parsed logs to. Create this directory before running the Python script in step 3. If it is not created, a File Not Found error will occur.dbutils.fs.mkdirs("dbfs:/cluster-logs/<cluster-id>/logs/")
Example:
dbutils.fs.mkdirs("dbfs:/cluster-logs/0130-102557-aft119/logs/")
Note
You can create a mount point for this directory if you prefer using external storage.
Open a new Python notebook.
Copy the contents from the Python script below into the notebook cell. The script will consolidate SQL statements which run over several lines into a single line. Replace the values of
input_dirandoutput_dirwith real values:input_dir—The directory you find in the Cluster Log Path that you specified when enabling the logs.output_dir—The logs output directory you created in step 1.
Important
If you are accessing the directories mounted onto the Databricks File System (DBFS), use the prefix
/dbfs/mnt/<mounted-filepath>, for example:/dbfs/mnt/cluster-logs/0130-102557-aft119/driver/and/dbfs/mnt/cluster-logs/0130-102557-aft119/logs/where/mnt/cluster-logsis the mount name.If you are accessing the log files directly on DBFS, use the DBFS filepath
/dbfs/<file-path>, for example:/dbfs/0130-102557-aft119/driver/and/dbfs/cluster-logs/0130-102557-aft119/logs/.If the file path for
input_diroroutput_diris not specified correctly, the script will not be able to locate the files.Python script to off-load parsed logs
import gzip
import re
from datetime import datetime, timedelta

input_dir = '/dbfs/mnt/cluster-logs/0130-102557-aft119/driver/'
output_dir = '/dbfs/mnt/cluster-logs/0130-102557-aft119/logs/'

required_logger_line_regex = r'^\d+-\d+-\d+ \d+:\d+:\d+\.\d* \[[^\]]*?\] \S+ (?:SparkSqlParser|audit): .*'
logger_line_regex =  r'^\d+-\d+-\d+ \d+:\d+:\d+\.\d* \[[^\]]*?\] \S+ \S+:.*'

prev_line = ''
line_count = 0
file_date_hour = str((datetime.now() - timedelta(days=0, hours=1)).strftime('%Y-%m-%d-%H'))

input_file_name = input_dir + 'log4j-' + file_date_hour + '.log.gz'
output_file_name = output_dir + 'log4j-' + file_date_hour + '.log.gz'
print('Transforming log4j-{}.log.gz'.format(file_date_hour))

with gzip.open(input_file_name, 'rt') as fin:
  with gzip.open(output_file_name, 'wt') as out:
    for line in fin:
      line = line.strip()
      if not line:
        continue
      if re.match(required_logger_line_regex, line):
        if prev_line:
          out.write(prev_line + '\n')
          line_count += 1
        prev_line = line
      else:
        if re.match(logger_line_regex, line):
          if prev_line:
            out.write(prev_line + '\n')
            prev_line = ''
            line_count += 1
        elif re.match(required_logger_line_regex, prev_line):
          prev_line = prev_line + r'\n' + line
    if prev_line:
      out.write(prev_line + '\n')
      line_count += 1
print('Lines written: ', str(line_count))
Run the script after at least one log file has been created and verify that you get output similar to the following:
Expected output when the file name is
log4j-2019-05-02-10.log.gzand there is no query or user information in the file:Transforming log4j-2019-05-02-10.log.gz Lines written: 0
Expected output when the file name is
log4j-2019-05-02-11.log.gzand query or user information is present:Transforming log4j-2019-05-02-11.log.gz Lines written: 275
You must schedule this Python script. We recommend scheduling it to run at or after ten minutes past the hour, which ensures the availability of archived logs. If the script is scheduled exactly at the hour, archived log files will not be available, as there is a five-minute delay between writing the contents to the log file and converting the log file into a compressed .log.gz file.
Create an external table with the
LOCATIONproperty set to the log output directory (output_dir):For setting the
LOCATIONproperty to an external storage directory mounted to DBFS, use the prefix/mnt/<mounted_filepath>. Example:/mnt/cluster-logs/0130-102557-aft119/logs/, where/mnt/cluster-logsis the mount name.For setting the
LOCATIONproperty to the directory present in DBFS, use the file path. Example:/0206-072111-lox669/logs/.
Example query to create the external table:
DROP TABLE IF EXISTS databricks_demo.external_log_table;
CREATE EXTERNAL TABLE databricks_demo.external_log_table(
  date_time_string STRING,
  thread_name STRING,
  level STRING,
  logger STRING,
  message STRING)
  ROW FORMAT
  SERDE 'org.apache.hadoop.hive.serde2.RegexSerDe'
  WITH SERDEPROPERTIES
    ("input.regex" = "^(\\S+ \\S+) \\[(.*?)\\] (\\S+) (\\S+): (.*?)")
  LOCATION
    "/mnt/cluster-logs/0130-102557-aft119/logs/";
Ensure that the external table is populated with the data from the files stored in the log output directory (
output_dir) by running a SELECT query on the table, for example:SELECT * FROM databricks_demo.external_log_table;
Create a view that takes this external table as an input and structures the data as required by Alation. See the example SQL below.
Example query to create the QLI view:
DROP VIEW IF EXISTS databricks_demo.alation_qli;
CREATE VIEW databricks_demo.alation_qli AS
SELECT
  distinct *,
  CONCAT(userName, '_', startTime) sessionId
FROM (
SELECT
  a.date_time_string startTime,
  regexp_extract(a.message, "Parsing command: (.*)", 1) queryString,
  CASE
    WHEN b.message is null THEN 'unknown'
    WHEN SUBSTR(b.message, 6, 11) = 'Basic token'
      THEN TRIM(SUBSTR(b.message, 18, instr(b.message, 'ip=') - 19))
    ELSE TRIM(SUBSTR(b.message, 5, instr(b.message, 'ip=') - 6))
  END AS userName
FROM databricks_demo.external_log_table a
LEFT OUTER JOIN databricks_demo.external_log_table b
  ON (a.thread_name = b.thread_name)
WHERE a.logger = 'SparkSqlParser'
  AND b.logger = 'audit'
  AND b.date_time_string > a.date_time_string);
Next, perform the configuration in Alation.
Configuration in Alation
To configure table-based QLI:
In Alation, open the Settings page of your Azure Databricks OCF data source.
Open the Query Log Ingestion tab.
Under Connector Settings and Query Log Ingestion Type, select the Table based query log ingestion radio button.
In the field Query to Execute, enter the query given below.
Replace the placeholder value
databricks_demo.alation_qliwith the name of your QLI view in theschema.viewformat.Do not substitute values
STARTTIME1andSTARTTIME2. Leave them as is.
SELECT
  SUBSTR(startTime, 1, 19) startTime,
  queryString,
  userName,
  sessionID
FROM databricks_demo.alation_qli
WHERE startTime BETWEEN 'STARTTIME1' AND 'STARTTIME2'
Click Save in the Query Log Ingestion Type section. Next, see Run QLI.
Run QLI
You can either perform QLI manually on demand or enable automated QLI:
To perform manual QLI, under the Automated and Manual Query Log Ingestion section of the Query Log Ingestion tab, ensure that the Enable Automated Query Log Ingestion toggle is disabled.
Note
Metadata extraction must be completed first before running QLI.
Click Preview to get a sample of the query history data to be ingested.
Click the Import button to perform QLI on demand.
To schedule QLI, enable the Enable Automated Query Log Ingestion toggle.
Set a schedule under Automated Query Log Ingestion Time by specifying values in the week, day, and time fields. The next QLI job will run on the schedule you have specified.
Note
The hourly schedule for automated QLI is not supported.