Document Hub Management
Alation Cloud Service Applies to Alation Cloud Service instances of Alation
Customer Managed Applies to customer-managed instances of Alation
Available in public preview from Alation version 2024.1
Important
You are viewing documentation for Classic Alation.
Document Hubs help your company organize long-form, written documentation related to your data. Read about the basics of Document Hubs in the overview topic. For help enabling Document Hubs, see Enable Document Hubs, Glossaries, and Terms.
On this page:
Best Practices for Document Hubs
This section describes best practices for using Document Hubs.
Document Hubs Define Types of Content
Document hubs should be based on a type of content rather than business units. Once you’ve defined your content types, business units can organize their documents of that type into folders inside the document hub. You can then govern who has access to specific folders based on their business unit.
For example, you may need to document definitions for your company’s metrics. Since metric definitions could be useful to all your business units, you create a document hub and name it Metrics. Within the Metrics document hub, you create a folder for each business unit that needs to define metrics—Finance Metrics, R&D Metrics, and so forth. If desired, you can restrict the visibility of each folder to user groups belonging to the appropriate business unit. Within their respective folders, each business unit can now create documents defining their own metrics.
As another example, you may need documentation for business practices. In this context, you might label folders as Business Plans, Go To Market Plans, or Data Applications. These documentation types could be used across multiple business units.
Make Names Meaningful
Document hubs all work the same, but you can assign customized names to your hubs, folders, and documents based on your business needs. These custom names appear in the Alation navigation and search features. Ensure that:
Names are meaningful for your organization
Names are unique across all document hubs
For example, if a document hub is meant to hold metric definitions, you could name your document hub Metrics. Your folders could be named after business units like Finance Metrics or R&D Metrics, or they could be named after lines of business or other categories that you define.
Create a Document Hub
You must be a Catalog Admin or Server Admin to create document hubs. Document hubs are created in a draft state and aren’t visible to regular users until you publish them. Document hubs can’t be deleted.
To create a document hub:
Click on the Settings gear icon in the top right corner.


Catalog Admins: A dropdown menu appears. Click Customize Catalog.
Server Admins: The Admin Settings page appears. Under the Catalog Admin section, click Customize Catalog.
Click the Custom Templates tab. The Document Hubs section will appear on the left. You may have to scroll down to see it.
Click the plus icon next to the Document Hubs title.
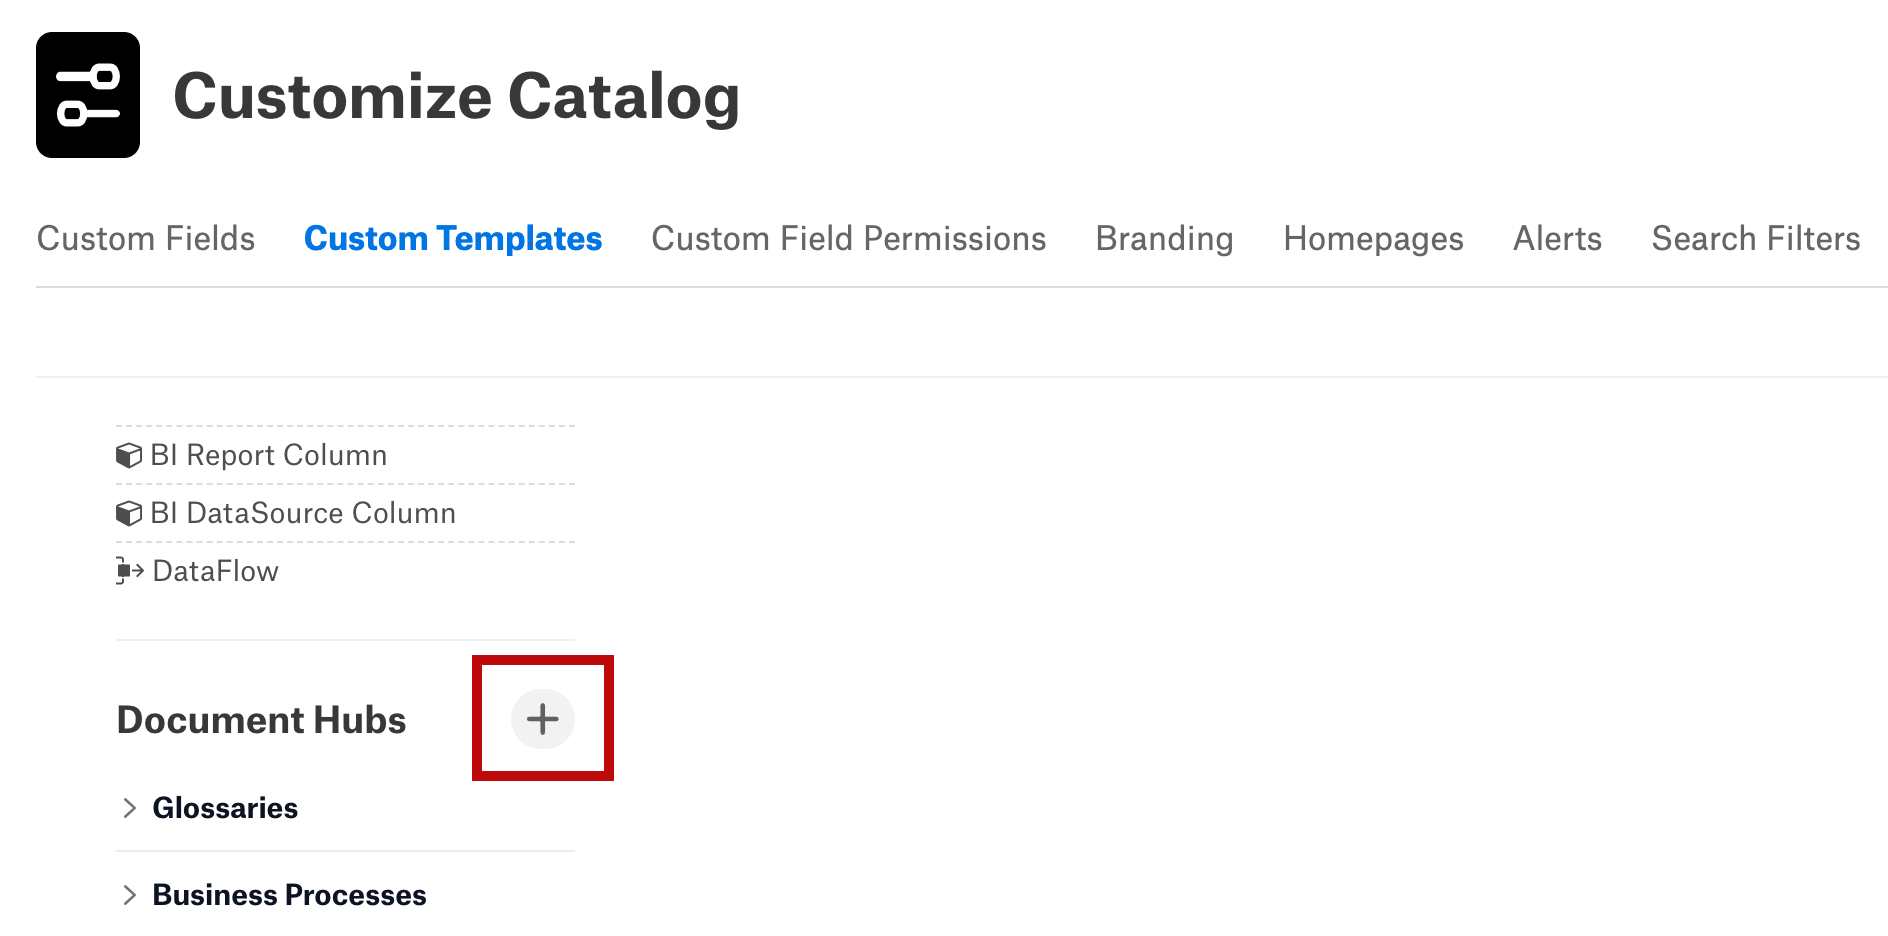
In the Create Document Hub dialog box, enter the document hub’s Name.
Click the Create button. The document hub editor appears, and a preview of the hub is shown at the bottom of the screen. The hub is in a draft state at first and won’t be visible to regular users until you publish it.
Customize the names of the hub’s folder and documents. Click on the pencil icon next to the default folder and document names, then enter a singular and plural version of the name.
Note
These names appear in the left navigation and search. As a best practice, they should be unique and meaningful for your organization and match the intended purpose of the document hub. For example, you could call folders groups, applications, categories, or projects. You could call documents metrics, policies, or help topics—whatever helps your users understand their purpose.
Customize the folder and document templates for this document hub. You can add custom fields and rearrange the fields to suit your needs. Folder and document templates are configured in a similar manner to data object templates. You can add, rearrange, and remove fields, but the template is only associated with this specific document hub.
You can add multiple document templates to your hub by clicking the plus icon next to the Document Templates heading.
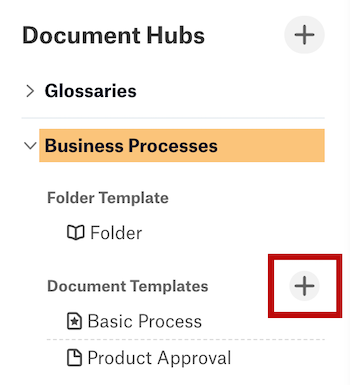
Once you’ve added more templates, you can change the default document template if desired. Click the drop-down menu next to Default document template to choose a default template for new documents.
You can preview Document Hub by clicking the Visit Hub link. With the hub page open, you can create folders and documents. At this point, when a Document Hub is unpublished, only admins can view it from this link.
When you’re ready for your users to see the document hub, click the Publish button.
Important
Publishing is permanent. You can’t unpublish a published document hub.
The document hub will become visible to all users in Alation as long as the Document Hubs 2: Show Glossary Hub feature flag has been enabled. See Enable Document Hubs, Glossaries, and Terms for more information on feature flags.
Once the document is published, Stewards can now create folders and documents in the new document hub.
Create a Folder
You must be a Steward or higher to create folders in a document hub.
To create a folder:
Navigate to the document hub catalog page. You can do this through the left navigation or by searching.
Click the + Create <Folder Name> button. The name used on the button is the name Alation admins gave to folder objects in this hub’s settings. As an example, if this document hub’s folders are named Categories, the button will say + Create Category.
The folder is created immediately, and the folder catalog page opens for editing.
Click the default title at the top of the page and enter the folder’s title. Optionally, enter a Description.
To control who can access this folder, click the three dots in the upper right, then click Access Settings.

To add documents to the folder, click the + <Document> button. The name used on the button is the name Alation admins gave to document objects in this hub’s settings. As an example, if this document hub’s documents are named Metrics, the button will say + Metric.
To add an existing document, click Add Existing <Document>, then search for the document you want and select it.
To add a new document, click Create New <Document>, then select a template and click Create. The new document is created immediately, and the document catalog page opens for editing. You can now edit and configure the document.
Modify any other fields associated with the folder as desired. Changes are saved automatically. The fields that are available depend on the folder’s template, which is assigned in the document hub’s settings.
Navigate to the document hub catalog page. You can do this through the Apps menu or by searching.
Click the + Create <Folder Name> button. The name used on the button depends on the document hub settings. As an example, if this document hub’s folders are named Categories, the button will say + Create Category.
The folder is created immediately, and the folder catalog page opens for editing.
Enter the folder’s title at the top of the page. Optionally, enter a Description.
To control who can access this folder, click Manage in the upper right, then click Access Settings.
To add documents to the folder, click the + <Document> button. The name used on the button is the name Alation admins gave to document objects in this hub’s settings. As an example, if this document hub’s documents are named Metrics, the button will say + Metric.
To add an existing document, click Add Existing <Document>, then search for the document you want and select it.
To add a new document, click Create New <Document>, then select a template and click Create. The new document is created immediately, and the document catalog page opens for editing. You can now edit and configure the document.
Modify any other fields associated with the folder as desired. Changes are saved automatically. The fields that are available depend on the folder’s template, which is assigned in the document hub’s settings.
Create a Document
You must be a Steward or higher to create documents in a document hub.
Documents must belong to at least one folder and can belong to multiple folders. You can create a document in two ways:
From within a document hub. You can select one or more folders during the creation process.
From within a folder that you want the document to belong to. The document will automatically belong to that folder. You can add it to more folders afterward.
To create a document from a document hub:
Navigate to the catalog page of the document hub you want the new document to belong to. You can do this through the left navigation or by searching.
Click the + Create <Document Name> button on the lower half of the screen. The name used on the button is the name Alation admins gave to document objects in this hub’s settings. As an example, if this document hub’s documents are named Metrics, the button will say + Create Metric.
Optionally, if you want the document to have a different template than the default, click the drop-down menu under Select an initial template for this <Document> and select a template.
Select one or more folders for the document to belong to. Once you select a folder, the Create button is enabled.
Click the Create button. The document is created, and the document catalog page opens for editing. You can now edit and configure the document.
Navigate to the catalog page of the document hub you want the new document to belong to. You can do this through the Apps menu or by searching.
Click the + Create <Document Name> button on the lower half of the screen. The name used on the button depends on the document hub settings. As an example, if this document hub’s documents are named Metrics, the button will say + Create Metric.
Optionally, if you want the document to have a different template than the default, click the drop-down menu under Select an initial template for this <Document> and select a template.
Select one or more folders for the document to belong to. Once you select a folder, the Save button is enabled.
Click the Create button. The document is created, and the document catalog page opens for editing. You can now edit and configure the document.
To create a document from a folder:
Navigate to the catalog page for the folder you want the new document to belong to. You can do this through the left navigation or by searching.
Click the + <Document Name> button. The name used on the button is the name Alation admins gave to document objects in this hub’s settings. As an example, if this document hub’s documents are named Metrics, the button will say + Metric.
Click Create New <Document>. A dialog box appears.
Optionally, if you want the document to have a different template than the default, click the drop-down menu under Select an initial template for this <Document> and select a template.
Click the Create button. The document is created, and the document catalog page opens for editing. You can now edit and configure the document.
Navigate to the catalog page for the folder you want the new document to belong to. You can do this through the Apps menu or by searching.
Click the + <Document Name> button. The name used on the button depends on the document hub settings. As an example, if this document hub’s documents are named Metrics, the button will say + Metric.
Click Create New <Document>. A dialog box appears.
Optionally, if you want the document to have a different template than the default, click the drop-down menu under Select template for <Document> and select a template.
Click the Create button. The document is created, and the document catalog page opens for editing. You can now edit and configure the document.
Edit or Configure a New Document
To edit or configure a new document:
Click the default title at the top of the page and enter the document’s title.
Click the Edit button to the right of Description and enter a description. This is the main content of the document.
To control who can access this document, click the three dots in the upper right, then click Access Settings. Choose the desired access level and assign users if needed.
To change which folders the document belongs to, click the three dots in the upper right, then click Membership Settings.
Modify any other fields associated with the document as desired. Changes are saved automatically. The fields that are available depend on the document’s template.
Enter the title at the top of the page.
Click the Edit button to the right of Description and enter a description. This is the main content of the document.
To control who can access this document, click Manage in the upper right, then click Access Settings. Choose the desired access level and assign users if needed.
To change which folders the document belongs to, click Manage in the upper right, then click Membership Settings.
Modify any other fields associated with the document as desired. Changes are saved automatically. The fields that are available depend on the document’s template.
Documents API
You can interact with documents using our public Documents API. You can create, retrieve, update, and delete documents using the API. Check out the Documents API.