Access Secrets Manager from Alation Agent Using an IAM User’s Credentials
Use the information in this topic to configure an Alation Agent installed on AWS or non-AWS infrastructure to read secrets from AWS Secrets Manager using IAM user credentials. With the Alation Agent, AWS Secrets Manager, and your on-premise data source all running on your own infrastructure, your data source credentials will never leave your VPC, and they are not stored in Alation or the Alation Agent.
Step 3: Install the Authentication Service Add-on on the Alation Agent
Step 4: Configure the Alation Agent to Use the IAM User’s Credentials
Note
To see other options for integrating with AWS Secrets Manager, see Integration with AWS Secrets Manager for Data Source Authentication Using OCF Connector.
Prerequisites
To use this feature, you must meet the following requirements:
You must be an Alation Cloud Service customer on the cloud-native architecture.
You must be using Alation Agent version 1.7.2.4360 or later. For help installing the Alation Agent, see Install the Alation Agent.
To access AWS Secrets Manager using an IAM instance profile:
You must be on Alation Cloud Service version 2024.1.4 or later.
Your Alation Agent must be installed on an Amazon EC2 instance.
You must install Authentication Service Add-on version 5.14.0.1882 or later on the Alation Agent.
To access AWS Secrets Manager using an IAM user’s credentials:
You must be on Alation Cloud Service version 2024.1.5 or later.
You must install Authentication Service Add-on version 5.14.0.1968 or later on the Alation Agent.
You must have a supporting OCF connector installed on the Agent. To find out if a specific connector supports this feature, see the documentation for the specific connector in the Open Connector Framework section.
Note
You can use the Native Data Sources API to migrate a data source from an OCF connector that’s not on an Alation Agent to an OCF connector that is on an Alation Agent.
Step 1: Create a Security Policy to Access Secrets Manager
This step is performed in the AWS IAM console
For the AWS Secrets Manager integration, you’ll need an AWS IAM policy granting access to AWS Secrets Manager. Here and below, a substitute name read_secrets_policy is used to refer to this policy.
If you haven’t established a read_secrets_policy yet, create one:
Log in to the AWS IAM management console.
From the left-hand menu, under Access management, select Policies.
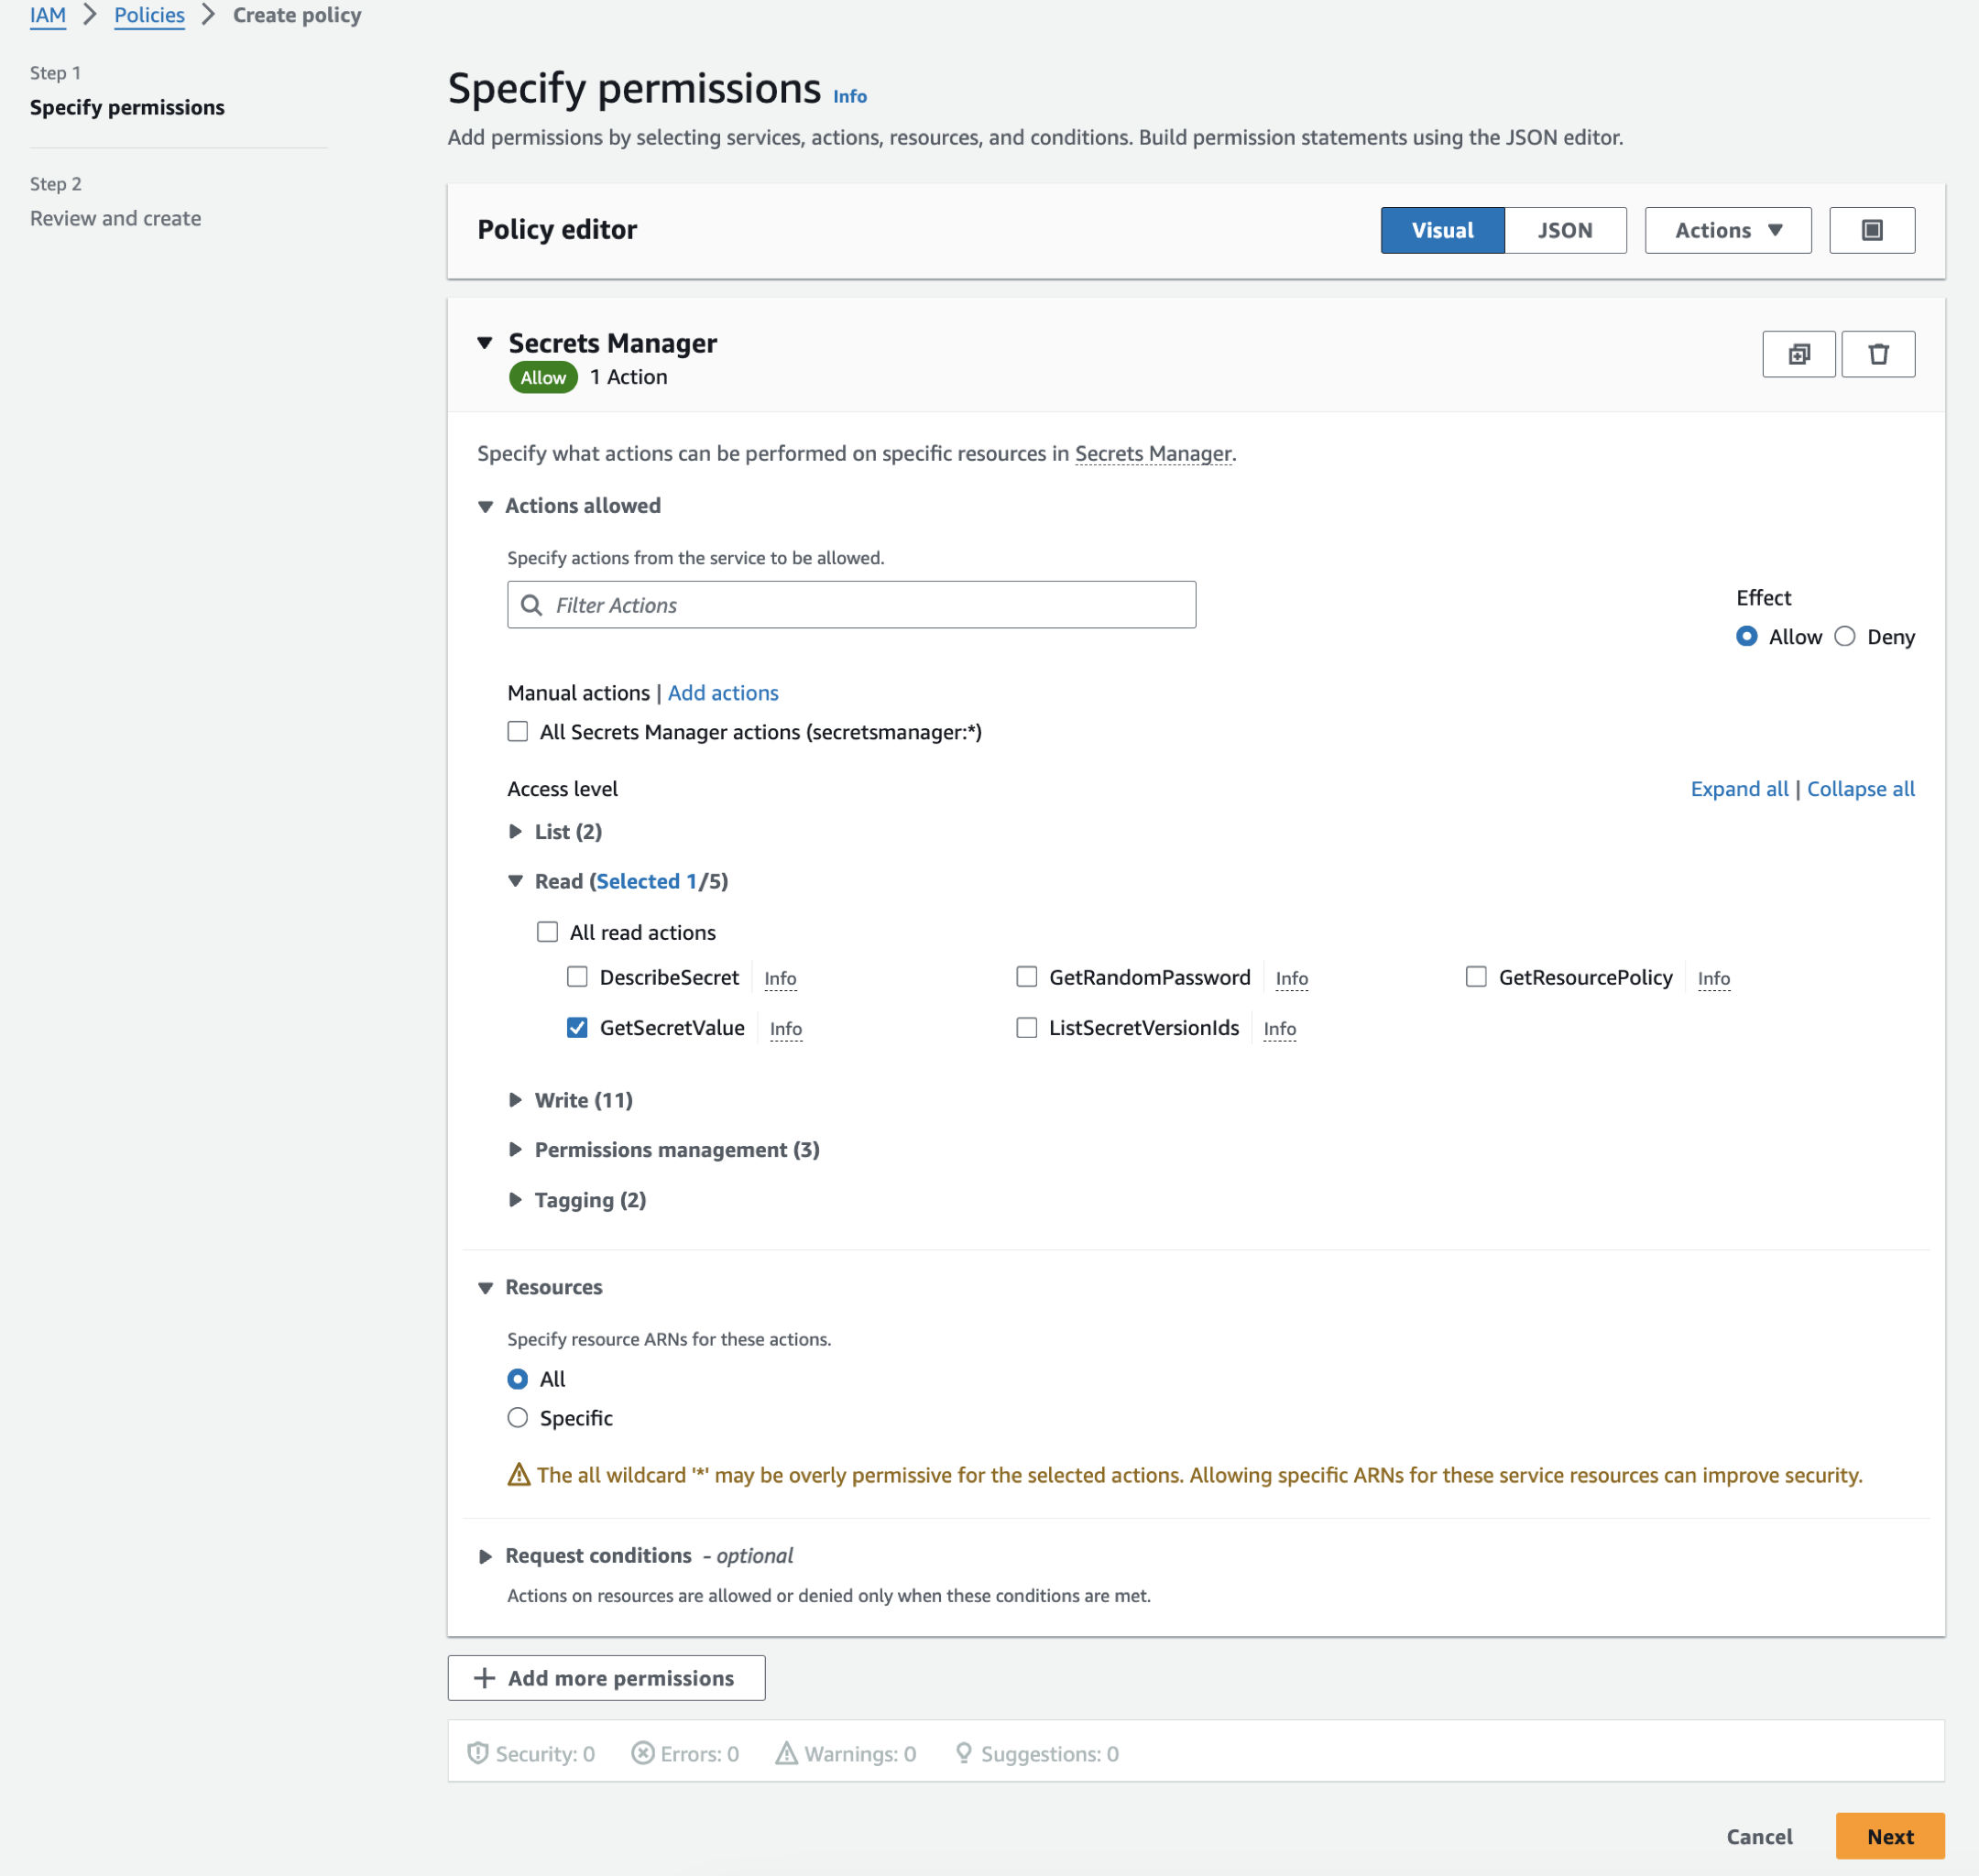
Click Create policy. The policy editor will open.
Under Select a service, type secrets in the search bar and select Secrets Manager. This will display actions relevant to the service.
Under Actions allowed, expand the Read list and select the checkbox for the action GetSecretValue.
Under Resources, select All.
Note
You can restrict the permissions by providing access to specific resources only:
Instead of All, select Specific.
Click Add ARNs to specify the resources by entering the resource’s region, ARN (Amazon Resource Name), and secret.
You can adjust the resource permissions anytime by editing this policy.
Click Next. The Review and create screen will open.
Under Policy details, in the Policy name field, provide a meaningful name.
Review the details, and click Create policy to create the policy. It will be added to the list of policies under your AWS account. Your policy JSON will look similar to the following:
{
  "Version": "2012-10-17",
  "Statement": [
    {
        "Sid": "VisualEditor0",
        "Effect": "Allow",
        "Action": "secretsmanager:GetSecretValue",
        "Resource": "*"
    }
  ]
}
Step 2: Configure an IAM User
This step is performed in the AWS IAM console
To configure an IAM user:
In the AWS user interface, open the IAM console (IAM dashboard).
In the left menu, under Access Management, select Users.
Select the user for whom you want to create access keys, or create a dedicated user for Alation.
Ensure that the user has the
read_secrets_policypolicy. If not, attach the policy to the user.Open the Security credentials tab of the user’s page and locate the Access keys section. Click Create access key in this section.
Create an access key ID and a secret access key. See Managing access keys for IAM users - AWS Identity and Access Management for more details.
Save the user’s access key and secret access key for future reference.
Step 3: Install the Authentication Service Add-on on the Alation Agent
This step is performed on the Alation Agent machine
To enable the Alation Agent to communicate with AWS Secrets Manager, you must install the Authentication Service add-on on the Agent.
To install or update the Authentication Service add-on on an Alation Agent:
If you don’t have the latest plugin yet, contact Alation Support to request it. The plugin is a Docker image named auth-service-docker-image-<plugin-version>tar.gz.
If needed, transfer the downloaded file to the Agent’s host machine. For example, if you downloaded the plugin file to a Unix-based machine, you could transfer the file using the
scpcommand in Terminal:scp /local/path/to/auth-service-docker-image-<plugin-version>.tar.gz <ssh-user>@<server-address>:/remote/path/to/agent
On the Agent’s host machine, unzip the .tar.gz file. Example:
gzip -d auth-service-docker-image-<plugin-version>.tar.gz
Install or update the plugin. To install the plugin from scratch, use this command:
sudo kratos addons install auth ./auth-service-docker-image-<plugin-version>.tar
To update the plugin, use this command:
sudo kratos addons update auth ./auth-service-docker-image-<plugin-version>.tar
Restart the Agent:
sudo systemctl restart hydra
Check that the plugin is running. It may take about two minutes for the plugin to start up.
sudo docker ps
In the output of this command, you should see
authlisted underIMAGE, and underSTATUSit should indicate that the plugin isUp. For example:CONTAINER ID IMAGE COMMAND CREATED STATUS PORTS NAMES 00d929b2582b auth "java -Dlog4j.config…" 11 seconds ago Up 10 seconds 0.0.0.0:11001->11001/tcp, :::11001->11001/tcp auth f80e23b27e2a application_gateway "/opt/cag" 11 seconds ago Up 10 seconds (health: starting) cag c8c16128644e proxy "/opt/reverseProxy" 12 seconds ago Up 11 seconds (health: starting) proxy 8c3d5cfeb3fd connector_21 "/opt/entrypoint.sh …" 12 seconds ago Up 12 seconds (health: starting) 127.0.0.1:10021->10021/tcp connector21 c8814bcadc3c agent "/opt/agent" 13 seconds ago Up 12 seconds (health: starting) 127.0.0.1:8080->8080/tcp agent
The Authentication Service add-on has now been installed. To troubleshoot the Agent or Authentication Service add-on, see Troubleshoot the Agent.
Step 4: Configure the Alation Agent to Use the IAM User’s Credentials
This step is performed on the Alation Agent machine
To configure the Alation Agent to use the IAM user’s credentials:
On the Alation Agent’s host machine, ensure you have root access.
sudo suChange the directory to /etc/hydra/auth/.
cd /etc/hydra/auth/
Create a directory called .aws under the /etc/hydra/auth/ directory.
mkdir .awsChange the directory to .aws.
cd .aws
Create a file called credentials where the AWS credentials will be stored. Use your favorite text editor to add an authentication profile in the following format, substituting the placeholders with the actual values you created above. The text you put in the square brackets is the profile name you will use later in the process.
[auth_profile_name]
aws_access_key_id=YOUR_ACCESS_KEY_ID
aws_secret_access_key=YOUR_SECRET_ACCESS_KEY
Note
Make note of the profile name you used in the file. You will need it in the next step.
Change the credentials file’s permissions to protect it from being read by unauthorized parties.
sudo chmod 540 credentials
Ensure that the Authentication Service add-on has access to read the credentials file.
sudo chgrp alationdocker credentials
Note
This command must be run with sudo because Linux security policies prevent non-privileged users, even the file owner, from changing any file ownerships.
The Authentication service runs as the alationdocker group.
Save the file and exit the text editor.
Step 5: Create an Authentication Profile
This step is performed in Alation
To create an authentication profile for the Secrets Manager integration:
Log in to your Alation instance as a Server Admin.
Click the Admin Settings gear icon on top right to open the Admin Settings page.
Click Authentication to open the Authentication tab. Locate the section Authentication Configuration Methods for External Systems.
Next to See configurations for, click the drop-down menu and select the relevant Alation Agent.
Click Add Configuration, and then select AWS Secrets Manager as the method type. If you’re creating a configuration for an Alation Agent, the only option is AWS Secrets Manager. The Authentication Configuration Method page will open in a new browser tab.
In Config Name, enter a unique name for the configuration. Save it for future reference when configuring the data source.
Under Region, select the appropriate AWS region for the Secrets Manager service (the region under which your secrets are stored).
Under Authentication Type, select IAM User Profile. The Profile Name field appears.
In the Profile Name field, enter the profile name you used in the credentials file.
Click Save. Alation attempts to create a connection, and if the connection is successful, the configuration is saved.
Now, you can use your integration with an OCF connector. See next: Configure Authentication with AWS Secrets Manager in Data Source Settings.